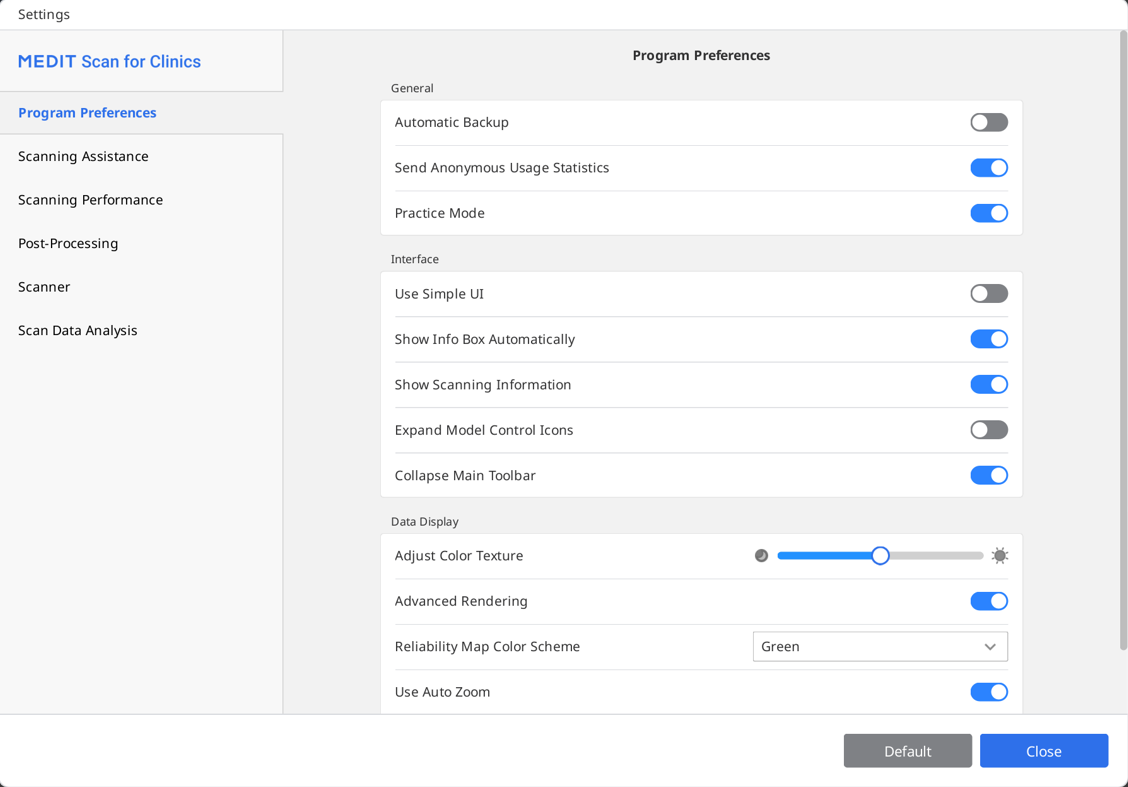
Go to Menu > Settings to open the Settings dialog for Medit Scan for Clinics.
🔎Note
When you click the "Default" button, all configured parameters will be reset to their default values.
Program Preferences
General
Automatic Backup | Save the current work temporarily. |
Send Anonymous Usage Statistics | Set whether to send anonymous usage statistics to Medit. Collecting Anonymous Statistics Medit is striving to constantly improve the product and user experience by collecting certain information such as:
The usage statistics will help the development team better understand user requirements and make improvements in future releases. We will never collect personal information, such as your name, company name, MAC address, or any other information related to personal identification. We cannot and will not reverse-engineer any collected data to find specific details concerning your projects. |
Practice Mode | Provide scanning training for users using a practice model. |
Interface
Use Simple UI | When on, the program switches from the default interface to the simple interface. | |
Show Info Box Automatically | When on, the program automatically shows the information box in the top left corner of the window while working with the program. | |
Show Scanning Information | Scan Time | Display the scan time for each stage or the total scan time. |
Number of Frames | Display the number of images taken by the scanner for each stage or the total number. | |
Scan Speed | Display the current scan speed. | |
Expand Model Control Icons | When on, the 3D model control icons of panning, rotating, zooming, and zoom fit are added to the side toolbar. | |
Collapse Main Toolbar | Collapse the main toolbar on the right by default. | |
Data Display
Adjust Color Texture | Adjust the brightness of the 3D model. |
Advanced Rendering | Display vivid 3D data with advanced technology applied. |
Visualization Method | Voxel Point: Displays data as voxel points. This view shows the raw, blocky structure of the scan. Useful for checking coverage, density, and areas that may need more scanning. |
Mesh: Displays data more as a connected surface mesh. This view gives a smoother, more realistic representation of the object and helps predict final processed model more accurately. | |
Reliability Map Color Scheme | Set the color of reliable data between Green, Blue, and Green/Yellow. |
Use Auto Zoom | When on, the zoom magnification is automatically set according to the size of the current scan data. |
Zoom Magnification | Set the zoom magnification manually when the "Use Auto Zoom" is disabled. |
Scanning Assistance
Smart Scan Guide | Identify any unusual actions during the scanning and provide relevant guidance. |
Smart Arrow | Show blue arrows to demonstrate low-reliability areas based on the gathered scan data. |
Warning for External Light (Beta) | Display a warning when an external light source affects the scan. |
Warning for Occlusal Data | When the user clicks "Complete" after scanning the data, the program checks the data and its alignment status acquired during the occlusion scan stage. |
Enable Audio Feedback | Indicate the status of the scanner through different sounds. |
Sound Library | Select the audio files used for scanner status notifications(audio feedback). You can use the default sounds or import custom audio files in .wav, .mp3, or .wma format. Separate sounds can be assigned for the following events:
Additional options are available for Scanning Sound:
|
Live View Image Stabilization | When on, automatic image stabilization is applied in the Live View during scanning to provide users with stabilized images with improved clarity and stability. |
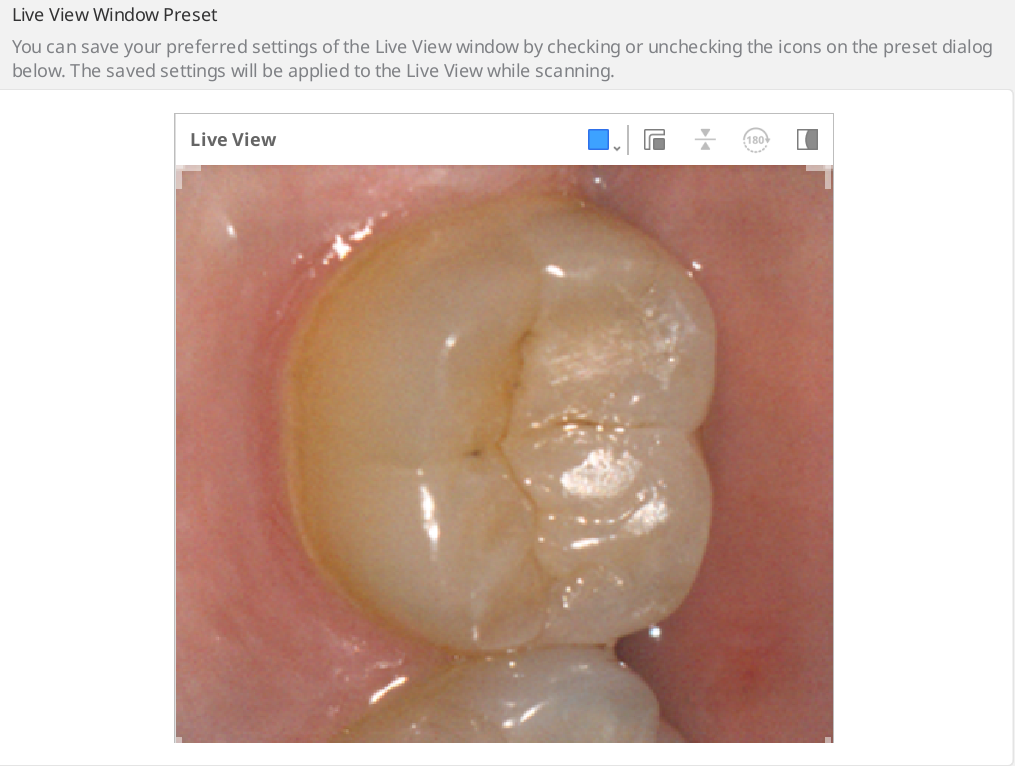
Live View Window Preset | Define the default settings for the Live View window options, such as window size, detach/reset window, and show/hide masking. |
Scanning Performance
Use GPU | Utilize this option to Improve overall computing performance using the GPU (graphics processing unit). |
Prevent Scan Data Misalignment | Align scan data using additional information when acquiring scan data with the Smart Scan Filtering option on. |
Extend Dynamic Range | Use peripheral data to assist in scanning difficult-to-scan areas. |
Smart Stitching Interval | Adjusts the interval to acquire new scan data for Smart Stitching. At the same time, a longer smart stitching interval will wait a bit longer for the user to acquire contiguous data before accepting discontinuous data. |
Use Glitch Filtering in Live View (Beta) | Filter glitching image acquired while scanning. |
Global Soft Tissue Filtering | Delete soft tissue and noise data. |
Auto Smart Scan Filtering | Automatically adjust the filter settings for Smart Scan Filtering during scanning when excessive gingiva data is acquired (Intense Teeth + Gingiva to Teeth + Gingiva). |
Active Noise Filtering (Beta) | Effectively remove noisy data acquired during scanning. |
Prevent Occlusion Misalignment (Beta) | Check the direction of occlusion and mandibular data to prevent misalignment while acquiring occlusion data. |
Metal Scan | Turn this option on to automatically apply parameters optimized for metal scans when metal prostheses, such as crowns, occupy more than a certain amount of scan area. |
Scan Assist | Automatically realigns scan data in real time during scanning and continuously maintains alignment after the initial alignment. |
Post-Processing
Set File Size Automatically | Turn this option on to apply optimal file size for the scan data automatically. |
File Size | Adjust the size of the result file. |
Optimize Occlusion Alignment | When on, the program optimizes the occlusion alignment data. |
Use Neighboring Colors for Filled Holes | Turn this option on if you want to fill in the empty spaces in scan data with the color of the adjacent data. |
Clean Out Data Layering (Beta) | Identify and remove double-layering or multiple-layering areas automatically while optimizing scan data. |
Use Background Processing | Process data in the background for stages where no data is acquired or manipulated. |
Optimize After Occlusion Alignment | Automatically optimize the maxillary and mandibular data when occlusion alignment is complete. |
Optimize Scan Data Automatically | Optimize automatically during the process of obtaining scan data. |
Texture Mapping (Beta) | When enabled, it enhances the texture of scanned data to provide a more realistic representation of teeth and gingiva. |
High-Resolution Data Processing
Apply to | Entire Scan | Apply high-resolution data processing to the entire scan data. |
HD Scan Parts Only | Apply high-resolution data processing to the parts scanned using High Detail Scan (HD Scan). | |
Apply to Prepared Teeth Data (Beta) | Turn this option on to let the program automatically detect the prepared teeth data and apply high-resolution data processing to the prepared teeth data. | |
Processing Data for Medit SmartX Workflow
Result Files (Scan Body Stage*) | Arch Data and Library Data | Create separate files: One for the scanned arch, and one for the library. |
Combined Arch Data with Library | Create a single file: Combine the scanned arch and library data. | |
Library Data Only | Create a single file: Include only the library data. | |
Overlapping in Combined Data | Keep Overlap Data | When creating the combined file, keep the overlapping parts of both datasets. |
Remove Arch Data | When creating the combined file, remove the overlapping parts of the scanned arch. | |
Remove Library Data | When creating the combined file, remove the overlapping parts of the library data. |
* Applicable only to the Mandibular/Maxillary Scan Body stages.
Scanner
Start Automatic Scan | The program automatically starts scanning when you enter the scan stages without having to perform any actions to start the scan. |
Calibration Period (Days) | Set the calibration period of the scanner. |
Initiate Scan with HD Scan | Set to start scanning in HD mode by default. |
Scan Light | Set whether to use blue light or white light for scan light. |
Minimum Scanner Temperature Notification | The scanner temperature is checked when the user starts scanning. |
Turn On UV Automatically | Set to turn on the UV light automatically when the scanner is connected or scanning stops. |
UV Operation Time (Minutes) | Set the time duration for the "Turn On UV Automatically" option. |
Turn On Vibration Feedback During Scanning | Notify users by vibrating the scanner in case of misalignment, etc. |
Anti-Fogging Fan Mode | Select a fan mode between "Silent Mode" and "High-Performance Mode" to remove fogging from the mirror when the scanner temperature is low. |
Scanning Experience | Select whether to display the screen more smoothly or acquire scan data with the best performance. |
Mobile Scanner Connection | Enables automatic search for available i900 Mobility handpieces when the program is opened. |
Adaptive FPS Mode | When enabled, it automatically adjusts the scanning frame rate (FPS) based on network stability and other factors to maintain smooth and reliable performance. When turned off, frequent FPS fluctuations may occur. |
Scan Button Actions
Double Click | Define the double-click action of the Scan button on the scanner. |
Triple Click | Define the triple-click action of the Scan button on the scanner. |
Long Click | Define the long-click action of the Scan button on the scanner. |
Touch Gestures (i900 only)
Touch Interface Tutorial | Run the Touch Interface Tutorial dialog to practice how to use touch interfaces, including Touch Band, Touch Pad, and Menu button. |
Touch Band - Double Tap | Define the double-tap action of the Touch Band on the scanner. |
Touch Band - Swipe Left | Define the swipe left action of the Touch Band on the scanner. |
Touch Band - Swipe Right | Define the swipe right action of the Touch Band on the scanner. |
Touch Pad - Double Tap | Define the double tap action of the Touch Pad on the scanner. |
Menu Button - Long Tap | Define the long tap action of the Menu Button on the scanner. |
Scanner as a Cursor - Air Mouse (i900, i900 classic only)
Cursor Size | Adjust the size of the cursor shown on the screen. |
Cursor Responsiveness | Adjust responsiveness of the handpiece to movement. |
Sleep Mode | Set the idle time before the scanner enters sleep mode. |
Auto Power Off (from Entering Sleep Mode) | Set how long the scanner stays in sleep mode before powering off. |
On Battery Power (i700 wireless, i900 Mobility only)
Change to Sleep Mode After | The scanner enters sleep mode when not used for the entered number of minutes. |
Turn off Scanner After | The scanner is turned off when not used for the entered number of minutes after entering sleep mode. |
When Plugged In
Change to Sleep Mode After | The scanner enters sleep mode when not used for the entered number of minutes. |
Turn off Scanner After | The scanner is turned off when not used for the entered number of minutes when plugged in. |
Scan Data Analysis
Realtime Intelligence
Enable Realtime Intelligence | Automatically identifies prepared teeth and evaluates scan data in real time to verify crown preparation requirements and provide immediate feedback for adjustments. |
Smart Scan Review
Enable Smart Scan Review Stage | Turn this option on to show the Smart Scan Review stage in the workflow. |
Align with Occlusal Plane When Entering Smart Scan Review Stage | Turn this option on to align the data to the occlusal plane when entering the Smart Scan Review stage before starting the data review. |
Show Tooth Reduction Depth for Preparation Review | Turn this option on to check tooth reduction depth when using the Preparation Review feature in the Smart Scan Review stage. |
Show Distance to Antagonist for Preparation Review | Turn this option on to check the distance to the antagonist when using the Preparation Review feature in the Smart Scan Review stage. |
Show Distance to Adjacent for Preparation Review | Turn this option on to check the distance to the adjacent when using the Preparation Review feature in the Smart Scan Review stage. |
Preparation Review
Distances
Set the values below as a criterion to determine if the tooth reduction was done properly. The set values are also used as a reference for Smart Scan Review.
Minimum Distance to Antagonist (mm) | Set the minimum value for distance to the antagonist. |
Minimum Distance to Adjacent (mm) | Set the minimum value for distance to the adjacent. |
Tooth Reduction Depth
Set the values below as a criterion to determine if the tooth reduction was done properly. The set values are also used as a reference for Smart Scan Review.
Apply Uniform Tooth Reduction | Enable this to apply uniform tooth reduction depth as a reference for all directions.
|
Minimum Reduction Depth (mm) | Set the minimum value for tooth reduction depth for all directions. |
Labial/Buccal (mm) | Set the minimum value for the labial/buccal reduction depth. |
Palatal/Lingual (mm) | Set the minimum value for the palatal/lingual reduction depth. |
Interproximal (mm) | Set the minimum value for the interproximal reduction depth. |
Occlusal (mm) | Set the minimum value for the occlusal reduction depth. |