Manage users, including their teams and clinics, in your organization.
Clinic Management
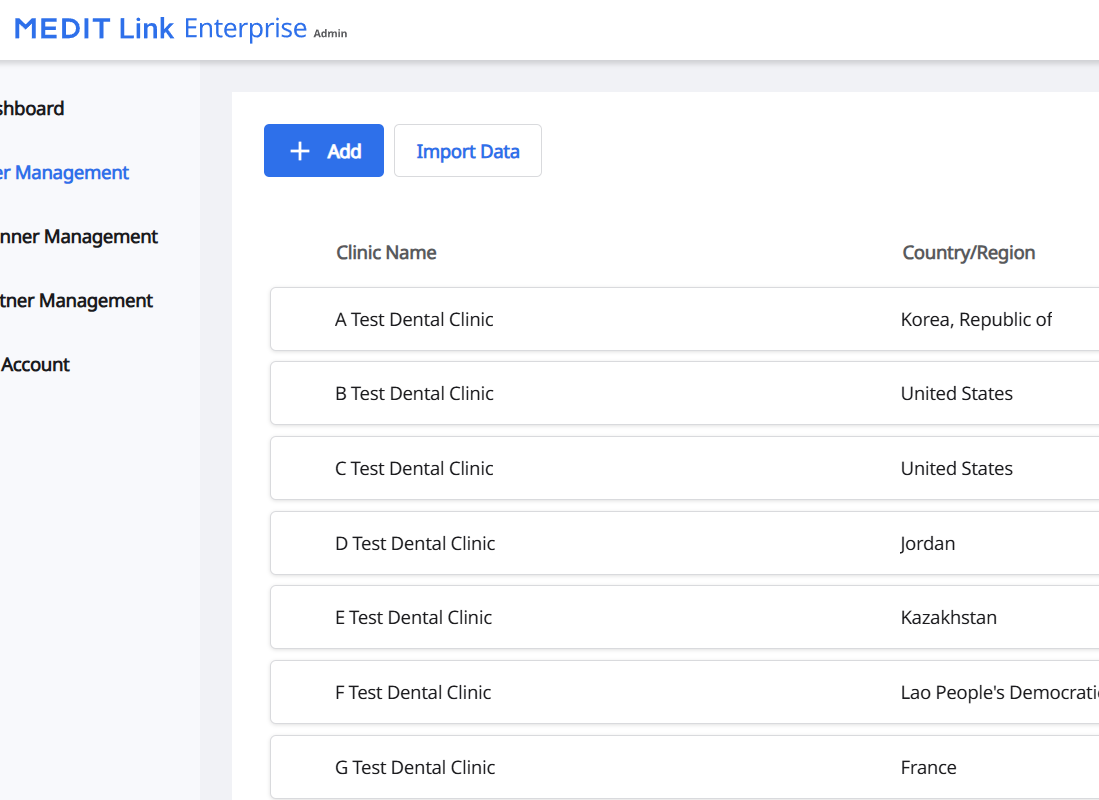
Add a clinic
Click Add to add one of your clinics.

If you already have added one clinic, click Add > Clinic to add another.

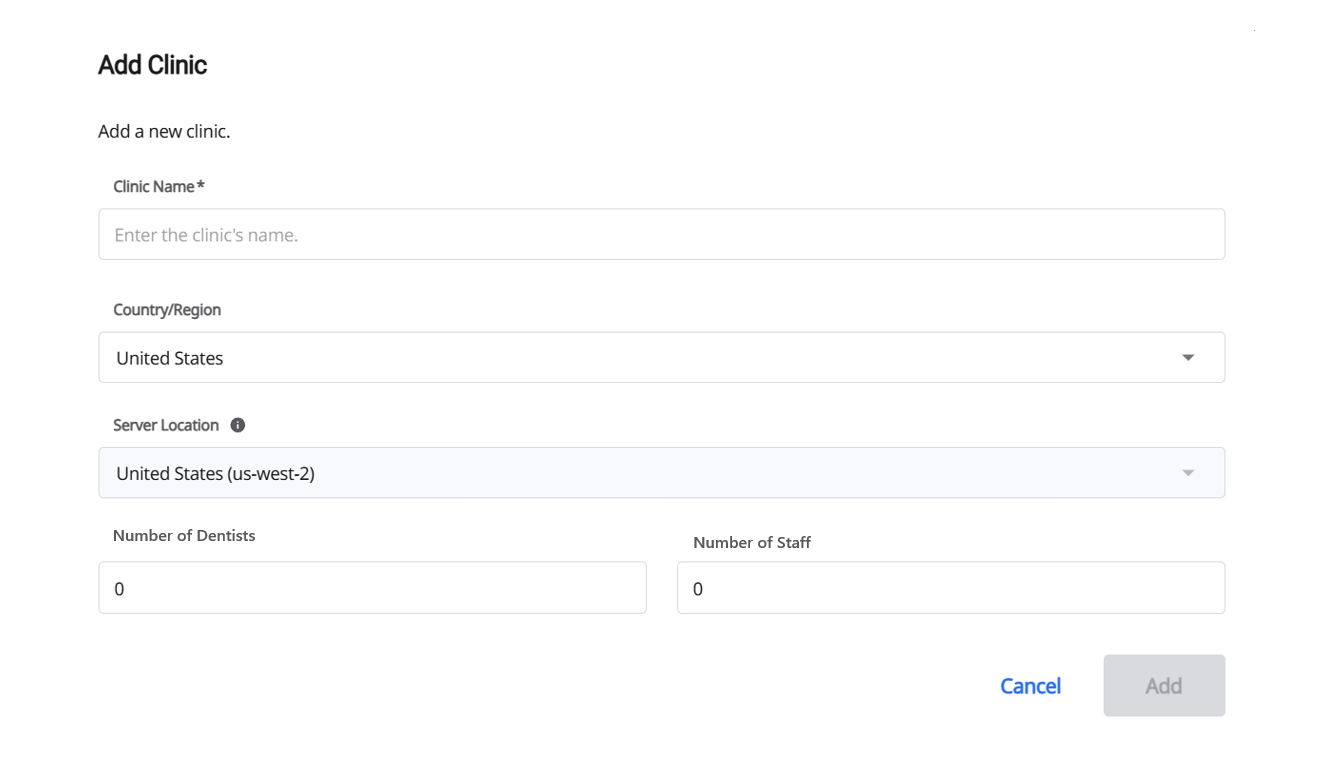
Clinic Name: Enter the clinic name.
Country/Region : Choose the country or region where the clinic locates.
(!) This field is fixed to China for users in China.
Server Location : All data will be saved in the selected server. The server is defined when the admin account was created and admin cannot change the server. If you have any question about the server please contact to enterprise@medit.com.
(!) This field is fixed to China for users in China.
Number of Dentists/Number of Staff: Enter the number of dentists and staff.
(!) This option is to check the clinic’s size and irrelevant with the users registered in Medit Link Enterprise. You can also change the number in
 > More Info.
Bulk add clinics
You can add multiple clinics at once by uploading a CSV file with their information. The system automatically imports the data, adds all listed clinics in a single step, and helps you save time by avoiding the hassle of adding them one by one.
To bulk add clinics:
Click Import Data and open the Import Users from CSV dialog.

Select Import Clinics, then click Clinic CSV Template to download the template and Country/Region List to download the list of country codes.
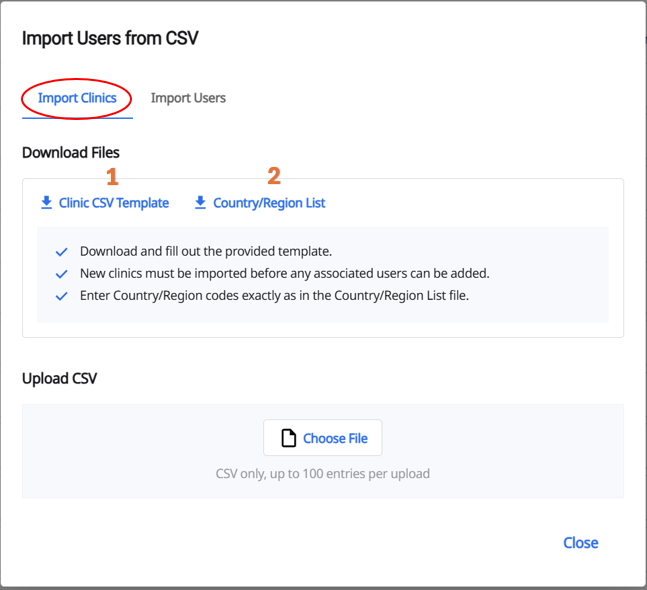
🔎Note
The Country/Region List download option is not available in China.
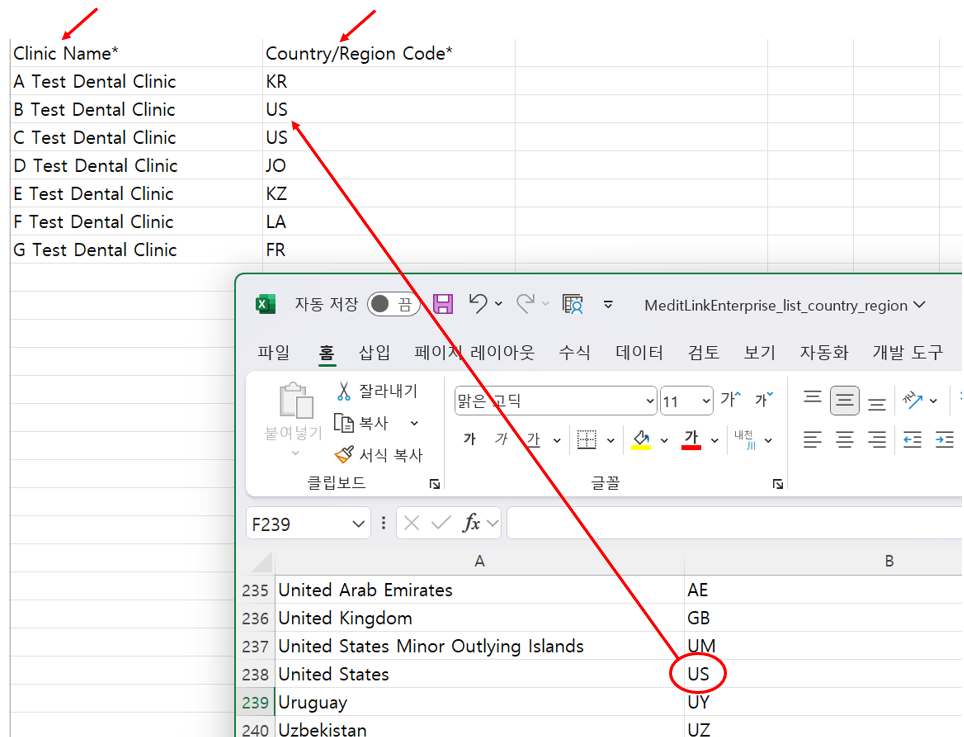
Fill in the Clinic Name and Country/Region Code columns in the template, using the exact codes provided in the list of country/region codes.
For example, to register a clinic in the United States, enter US exactly as shown in the list. Do not enter variations such as “U.S.” or “USA,” as the upload will fail if the code does not match.
You can upload up to 100 entries at a time.
🔎Note
The country/region code entry is not required for users in China.
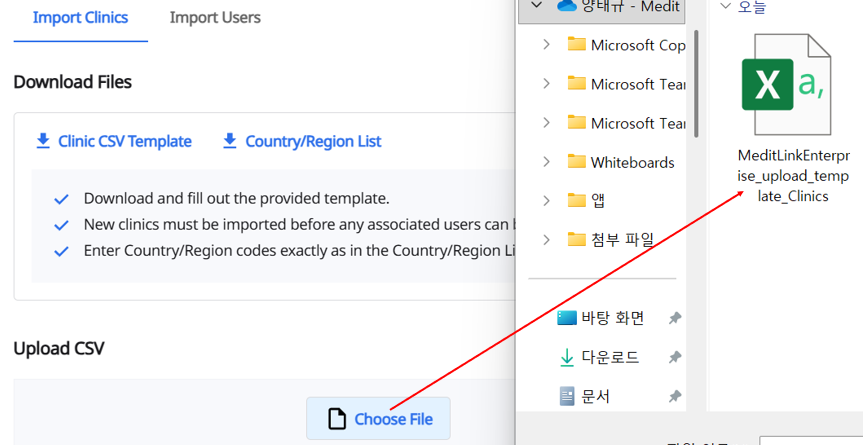
When you finish filling out the template, click Choose File and select the completed CSV file.
Click the Upload button when it appears.

Wait for the system to process the file. A progress bar will appear, followed by a confirmation message when the upload is successful.
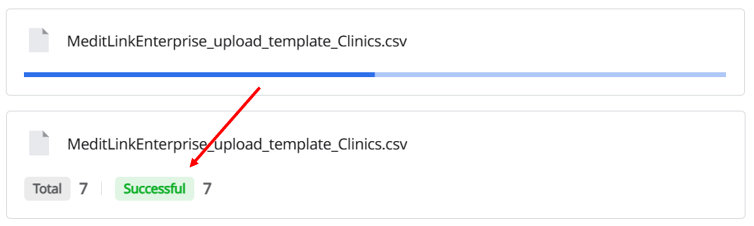
Once the upload is complete, the imported clinics will appear in your clinic list.
🔎Note
If some or all of the data fails to upload, the result screen will display the number of successful and failed records. Click Download Failed Records to check the detailed reasons for failure.
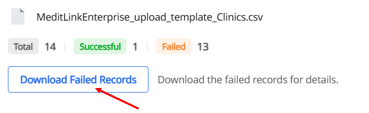 Typical failure reasons include:
Invalid file type (only CSV is allowed)
Missing required fields (marked with *)
Entry limit exceeded (maximum 100 entries per upload, between 2 and 100 characters per clinic name)
Invalid country/region code (value not in the provided list; not applicable in China)
Duplicate or invalid clinic name (e.g., already uploaded or containing invalid characters)
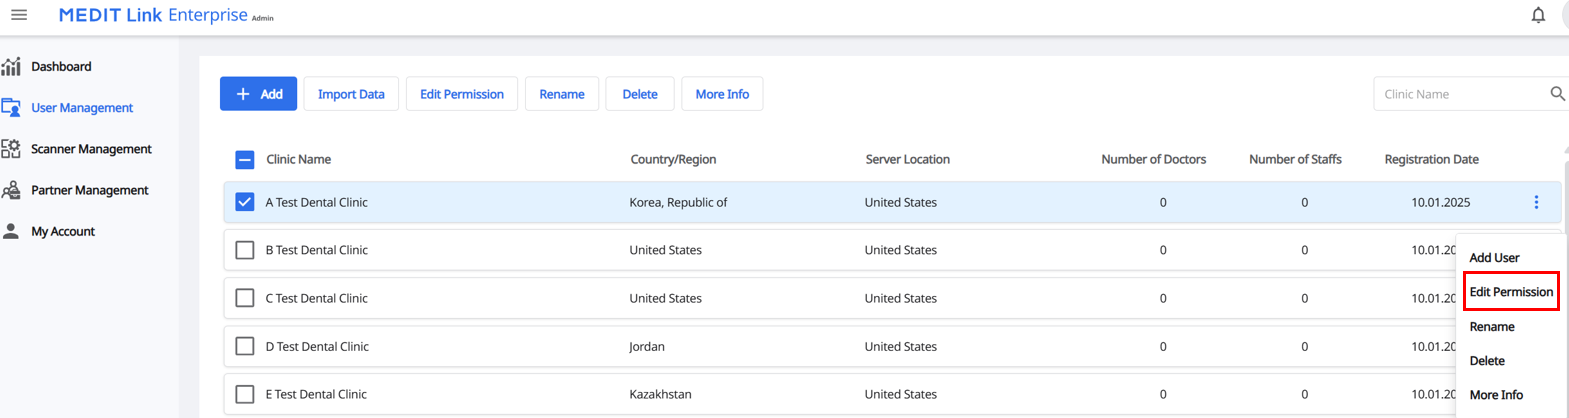
Delete a clinic
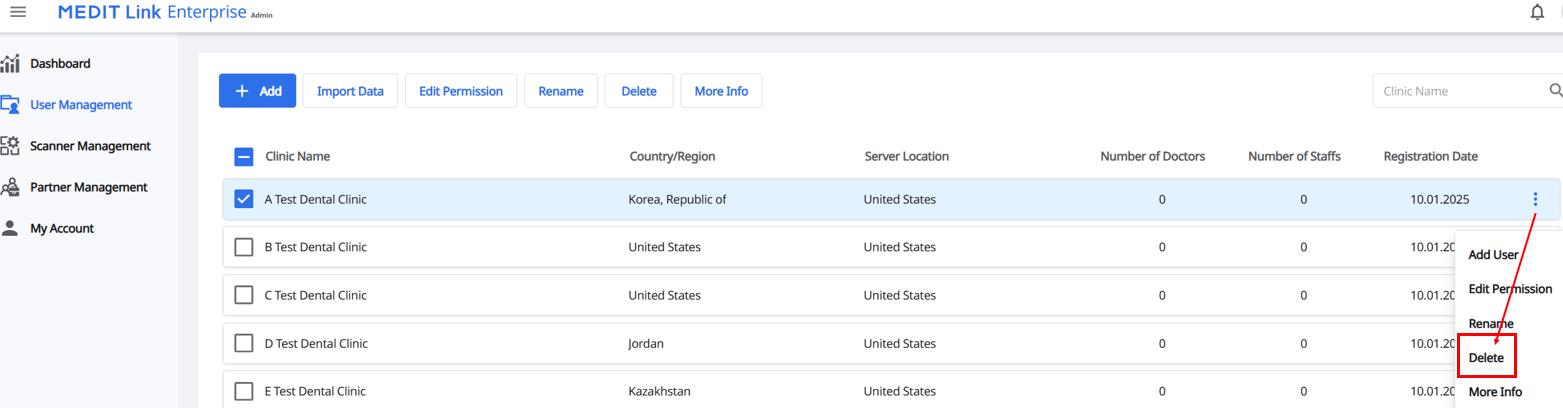
Delete the clinic, including all the teams and users. All the cases and data will be deleted as well. Mark the clinic’s checkbox you want to delete and click Delete.

You can also click > Delete to delete a clinic.
Permission settings for clinic
Add or remove a lab where users in this clinic can order a case.
Select a clinic and click Edit Permission

or Click > Edit Permission.
Search for a lab you want to add to the list.
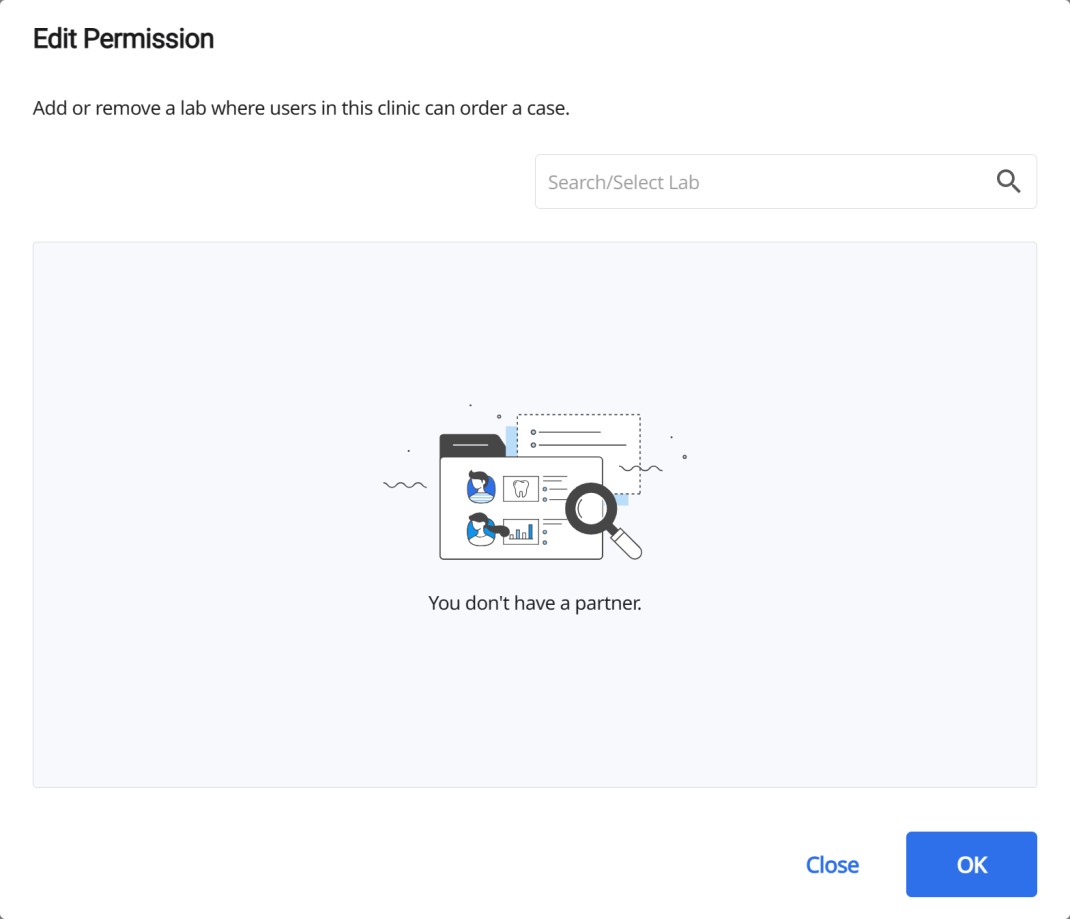
Click OK to send a partnership request.
Once the lab accepts the request, users in the clinic can start ordering a case to the lab.
(!) You can add the lab which is registered in Partner Management.
(!) You can also grant or cancel the permission to each user in a clinic. Read Permission settings for users for more details.
User Management
Add a user
Click Add > User to add a user.

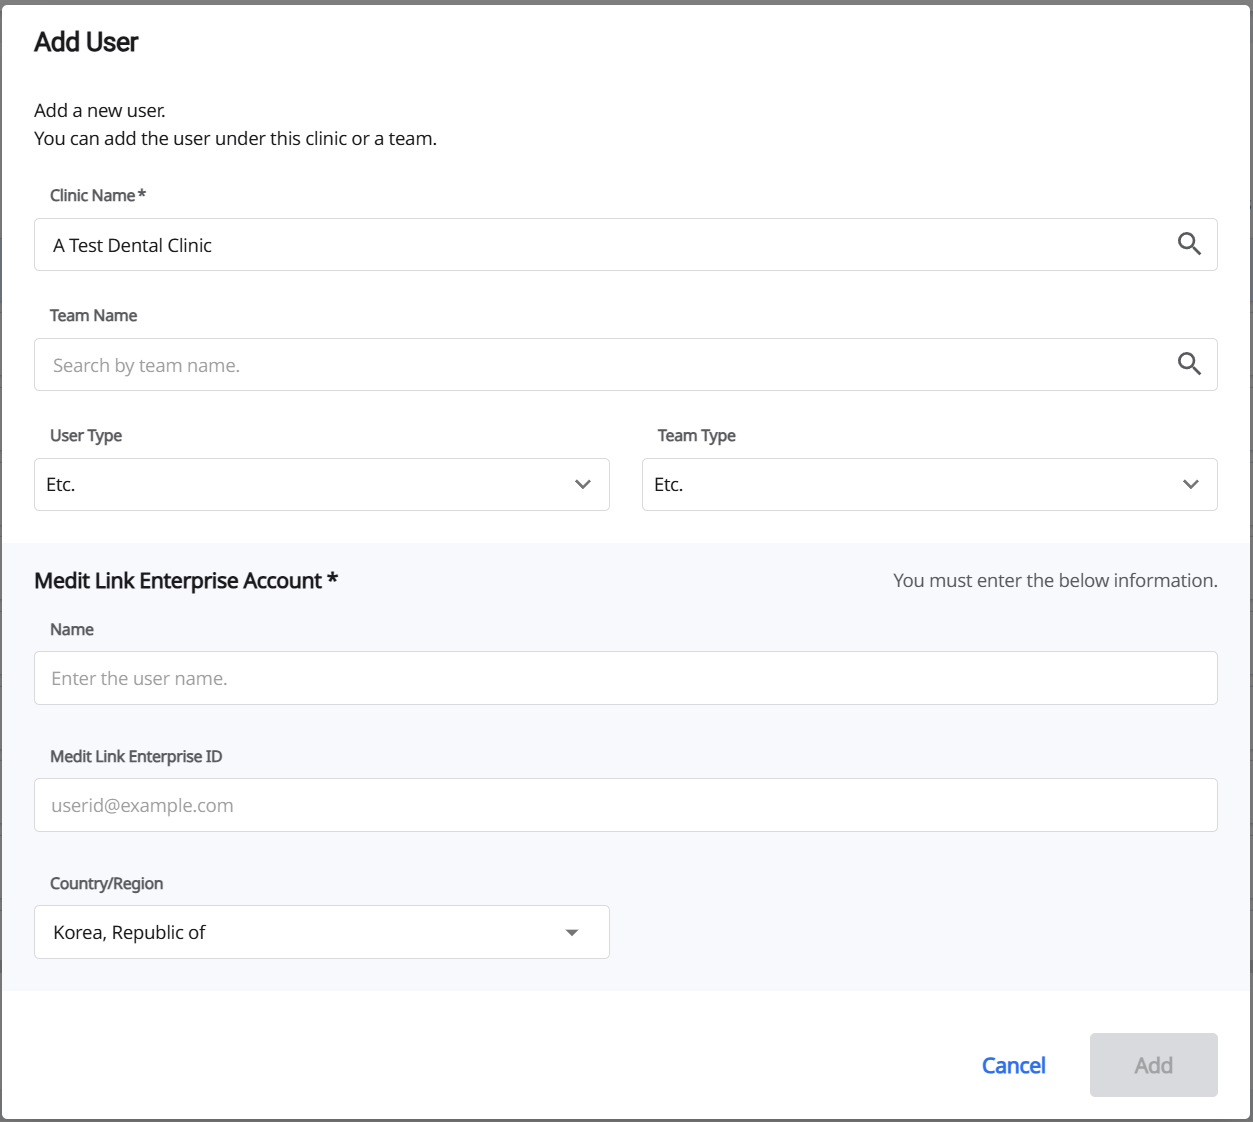
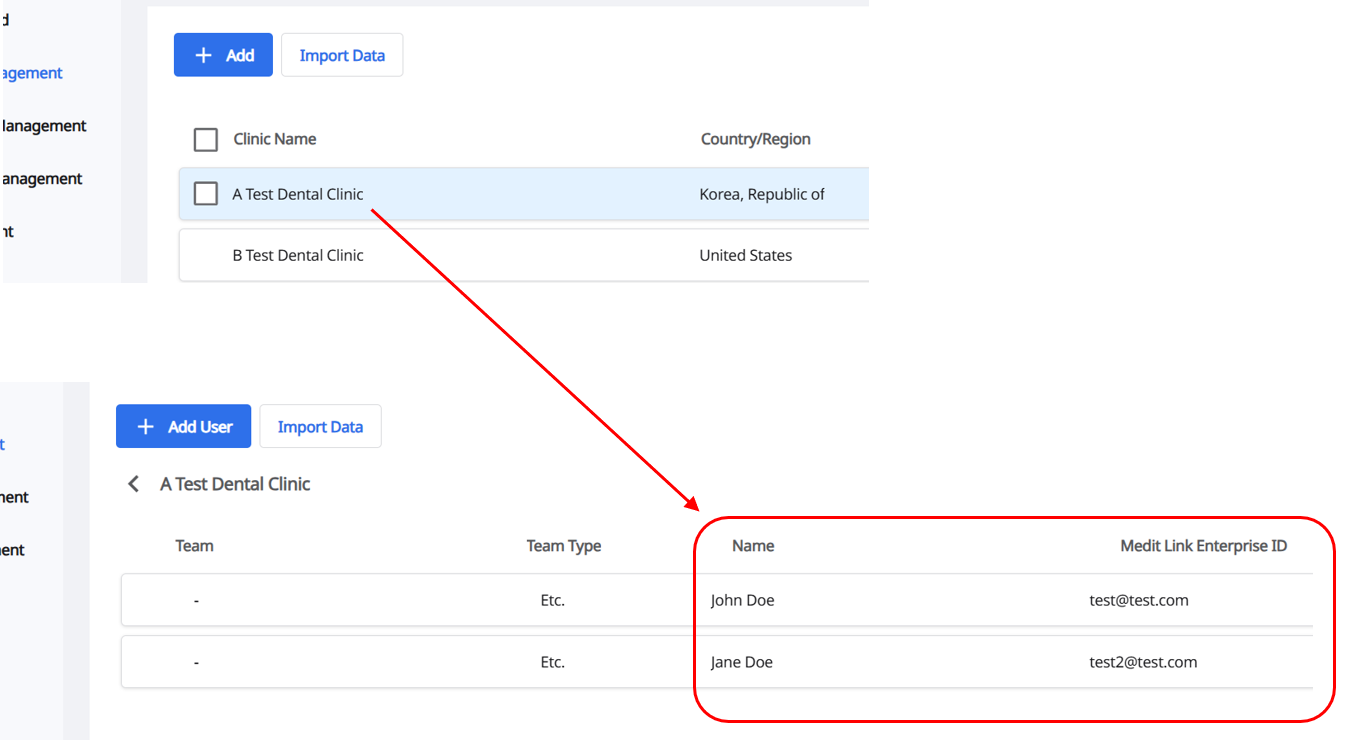
Clinic Name: Select the clinic where the user belongs. You must choose a clinic.
Team Name: Select the team to where the user belongs.
User Type: Choose a user type among Dentist, Staff, Etc.
Team Type: Choose a team type among Prosthodontists, Orthodontists, Prosthodontists & Orthodontists, Etc.
(!) Users without a team or who belong to “Etc.” can choose a Team Type. Otherwise, Team Type is automatically selected based on their teams.
Medit Link Enterprise Account: You must enter the users’ Medit Link Enterprise account information.
Name: Enter the user name.
Medit Link Enterprise ID: Enter the Medit Link Enterprise ID. ex) yourid@example.com
Country/Region : Choose the user’s country or region.
(!) This field is fixed to China for users in China.
Bulk add users
You can bulk add users in the same way as adding multiple clinics, by uploading a CSV file with their information.
From the Import Users from CSV dialog you need to:
Select the Import Users tab, then click User CSV Template and Clinic List.
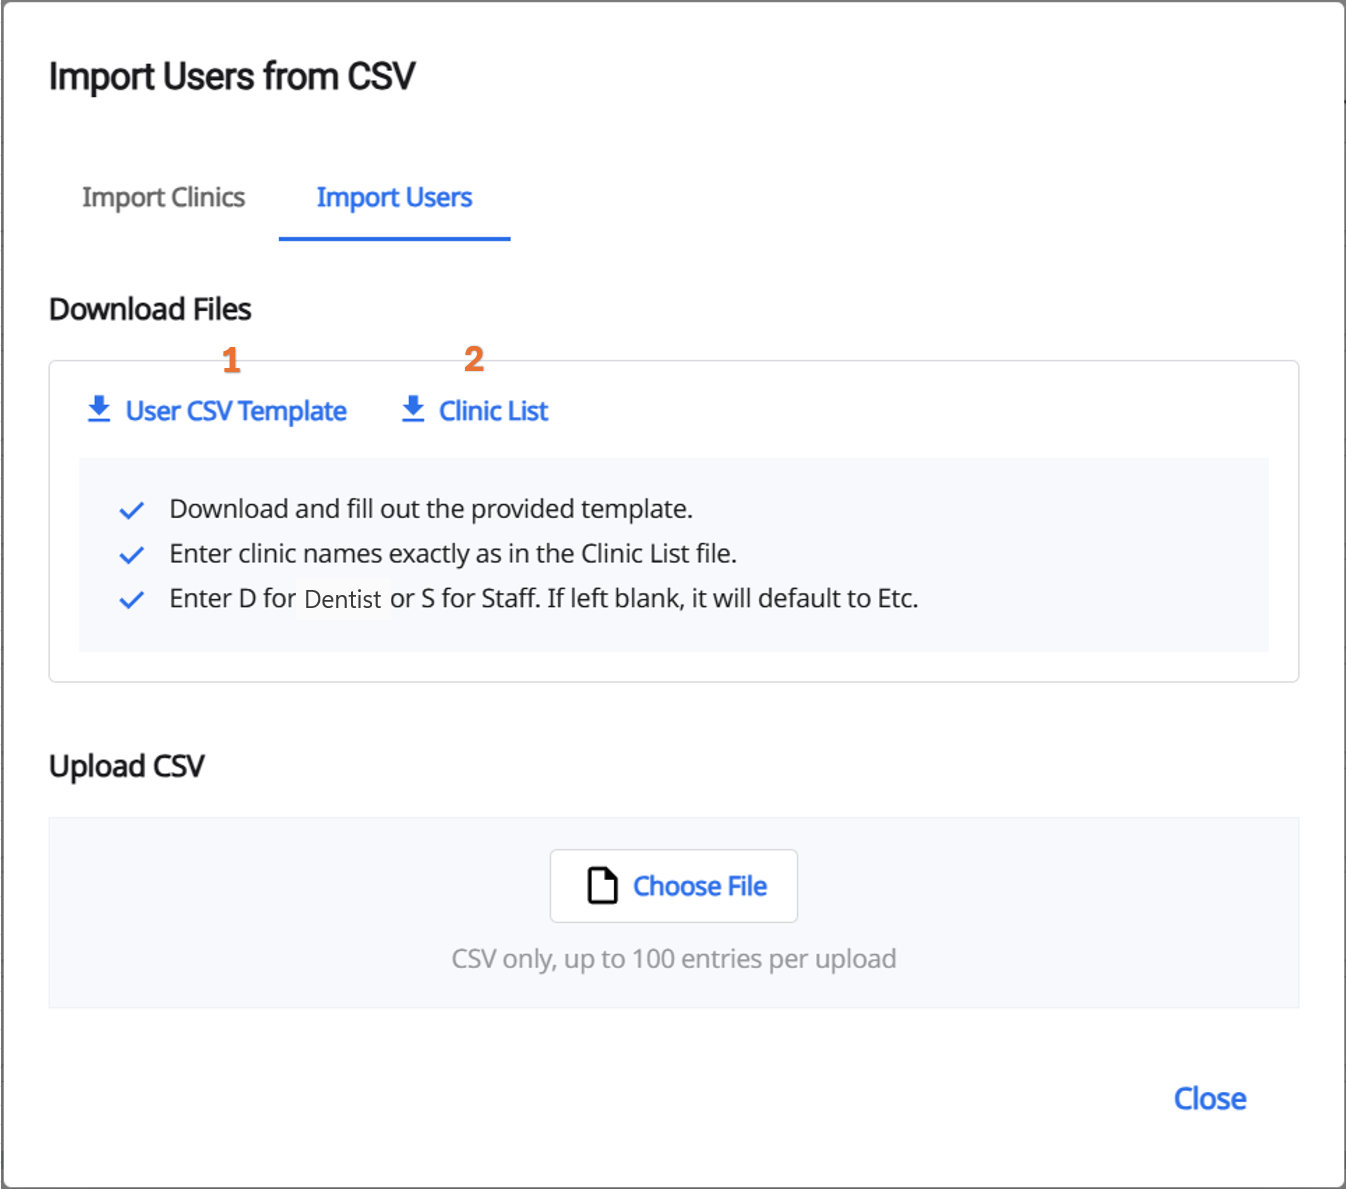
Open the downloaded template and the clinic list, which shows the clinics uploaded via Import Clinics. Fill in the Clinic Name, User Name, Medit Link Enterprise ID (Email), and User Role columns in the template, using the exact clinic names shown in the list.
For the User Role column, you must enter the letter D (Dentist) or S (Staff). Full words are not accepted. If the field is left empty, it will default to Etc. You can upload up to 100 entries at a time.
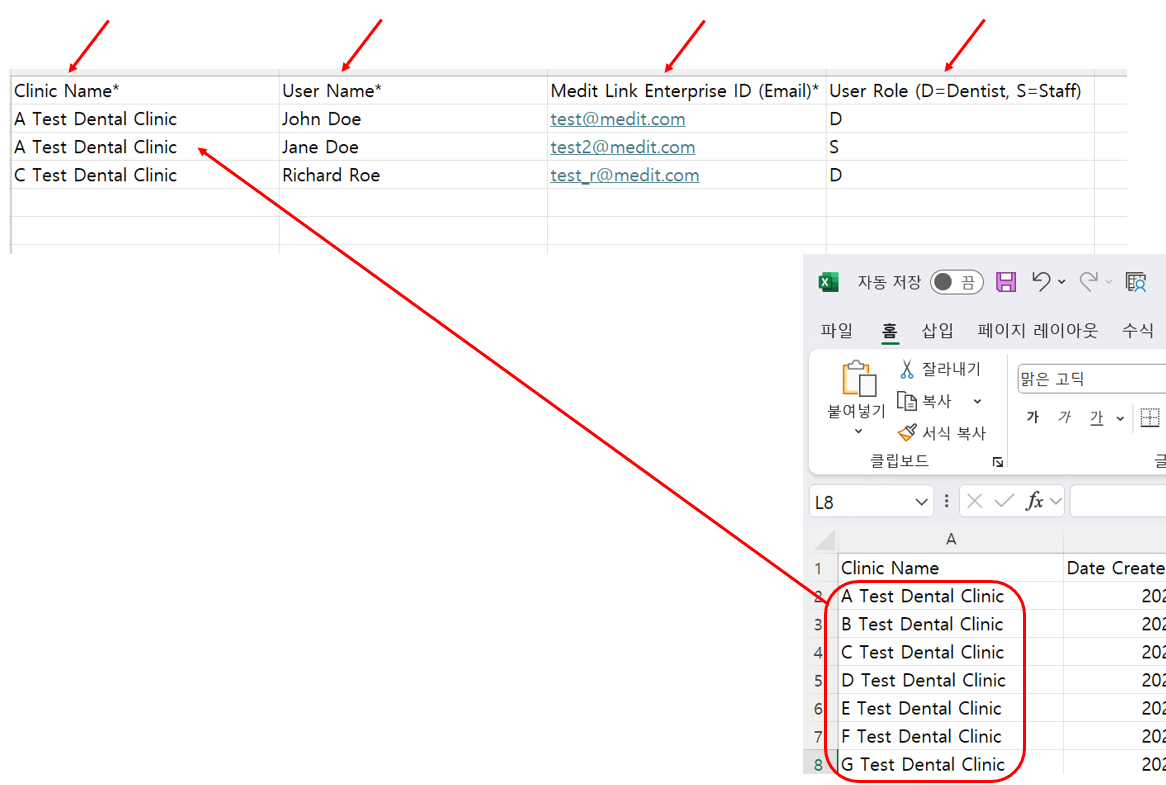
After filling out the template, upload it by following steps 4–6 in the Bulk add clinics section above.
Once the upload is complete, go to the User Management tab and select a clinic to see the uploaded users.
🔎Note
As with bulk adding clinics, click Download Failed Records to check the detailed reasons for upload failure.
 Typical failure reasons include:
Invalid file type (only CSV is allowed)
Missing required fields (marked with *)
Entry limit exceeded (maximum 100 entries per upload, between 1 and 64 characters per user name)
Invalid clinic name (value not in the provided list)
Duplicate or invalid user name and ID (e.g., already uploaded or containing invalid characters)
Invalid user role (only the letters D or S are permitted)
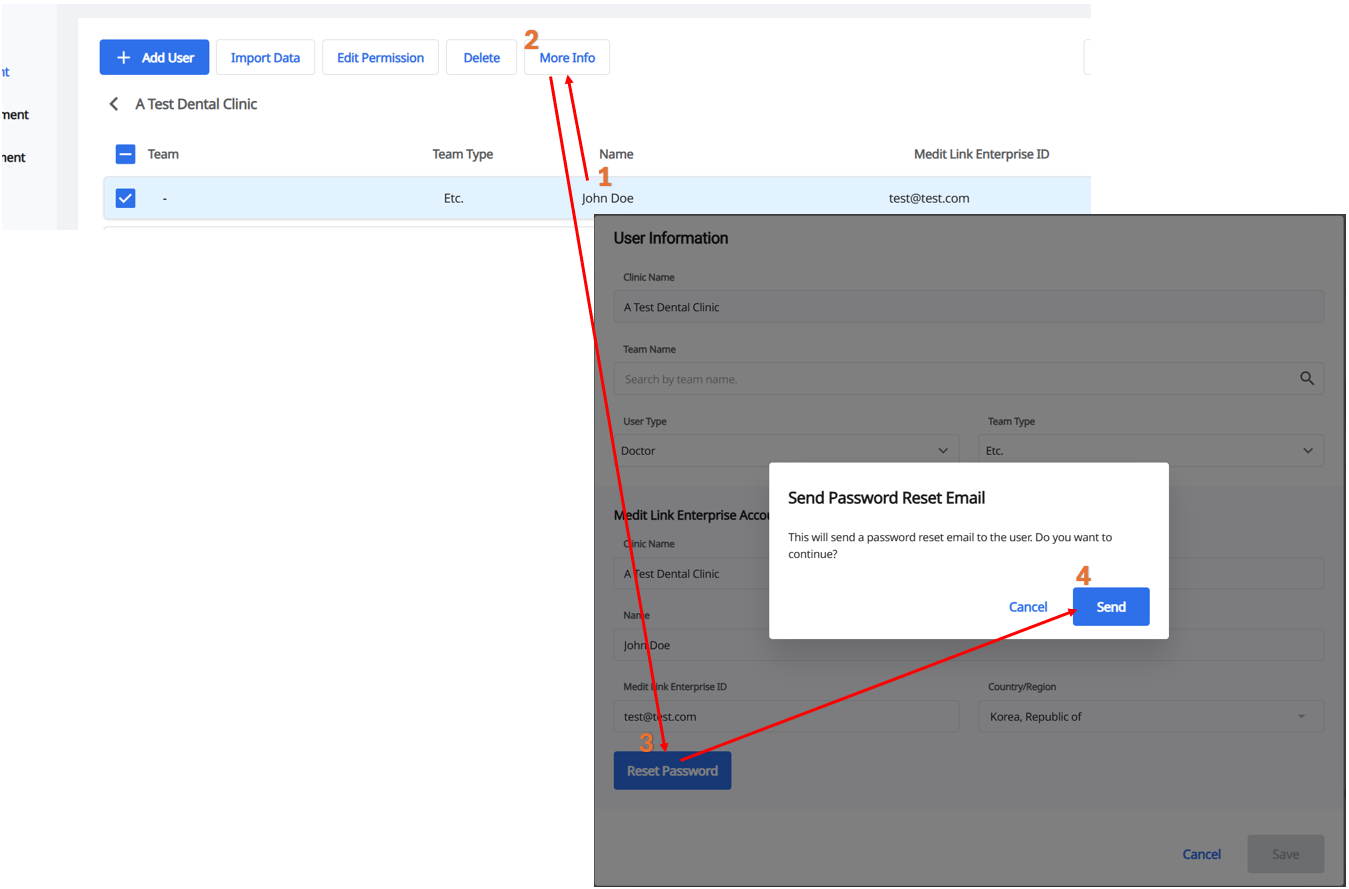
Once the upload is complete, newly added users will automatically receive an email with instructions to set a password. Accounts cannot be accessed until the password is set.
In case you need to send a password reset email:
Select the user you want to reset (1), then click More Info (2) to open the User Information dialog. In the dialog, click Reset Password to open the pop-up, and then click Send to confirm (3–4).
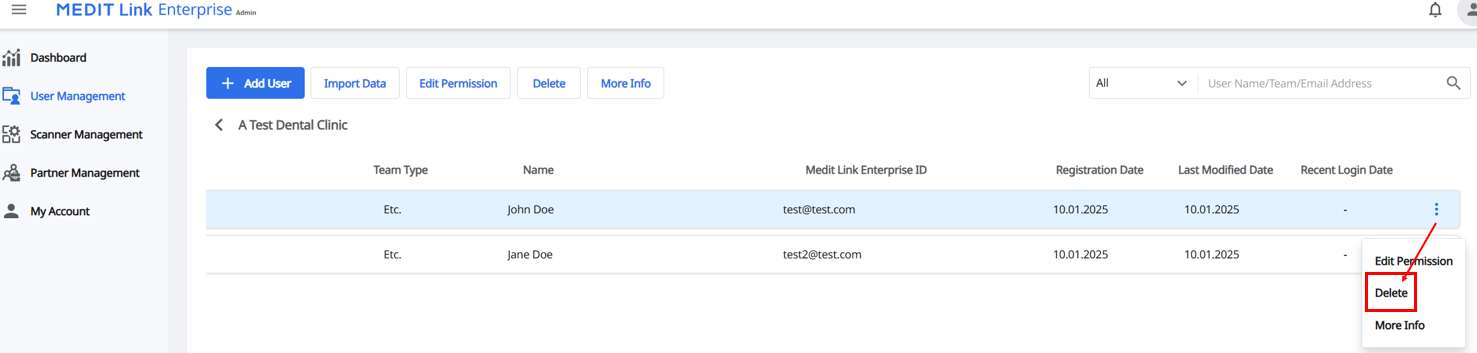
Delete a user
Deleting a user will also remove all associated cases and data. To proceed, select the checkbox for the user you want to remove and click Delete.

You can also click > Delete to delete a user.
Permission settings for users
Check the box of the users you want to edit and click Edit Permission.
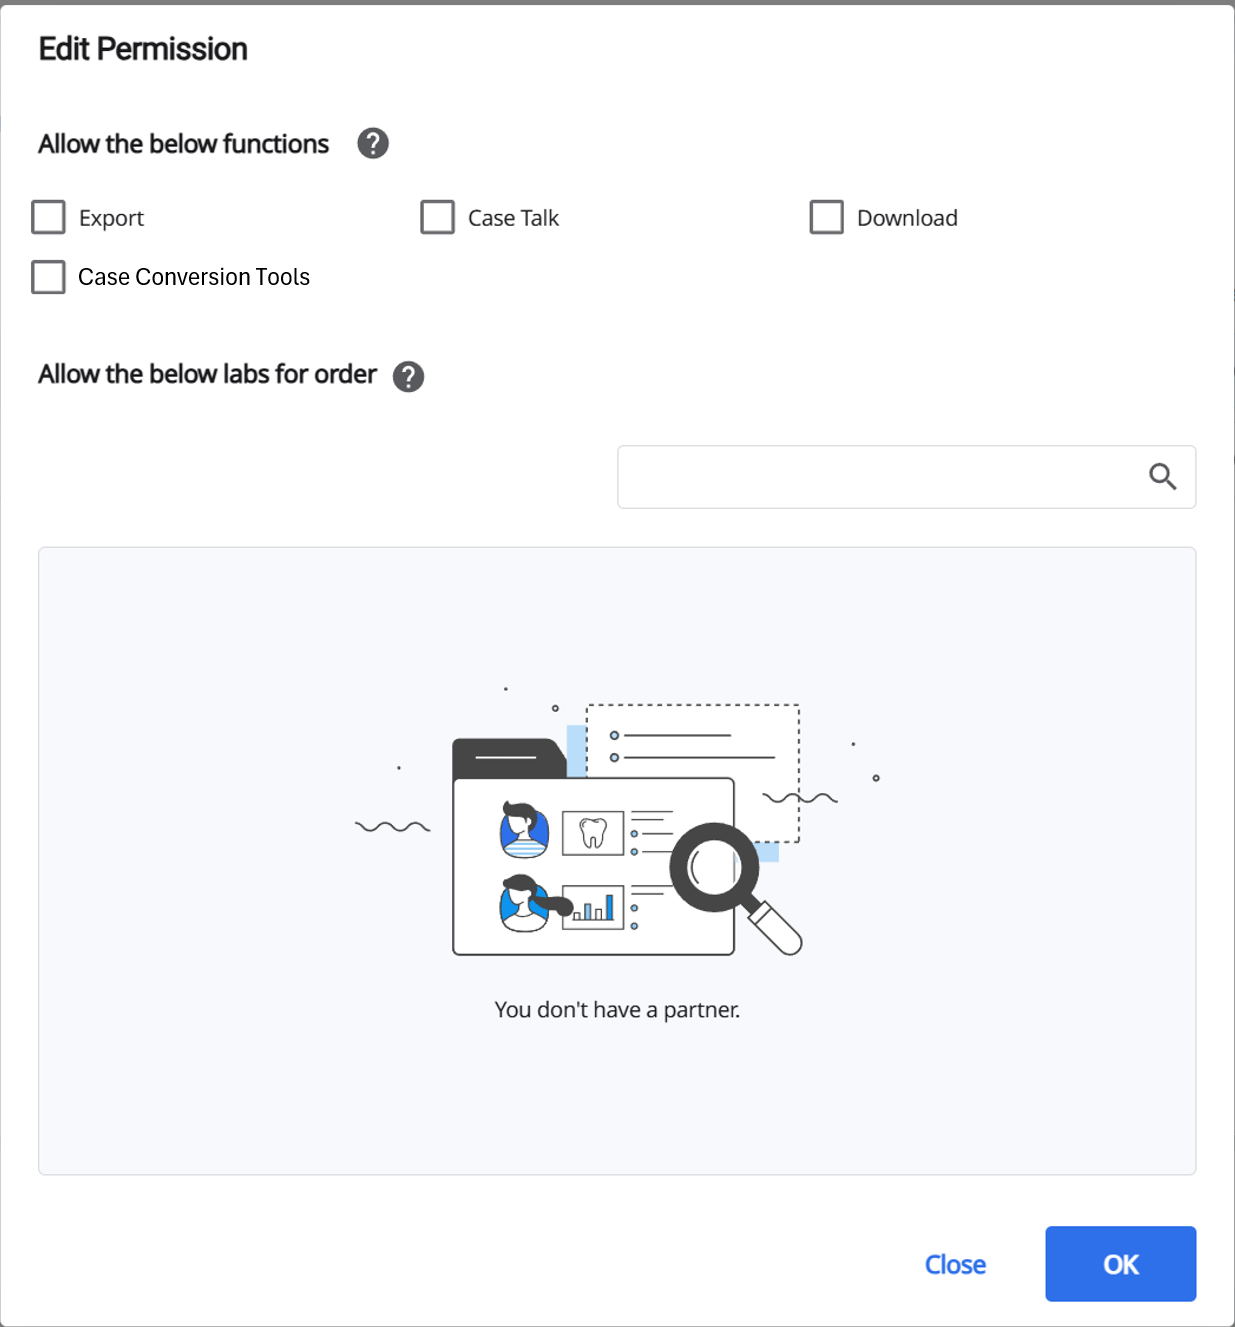
Allow the below functions : Mark the checkbox to allow users one or more functions.
(!) The users are restricted from exporting or sharing the patients’ data by default.
Allow the below labs for order : Add or remove a lab where users in this clinic can order a case.
The following options are available when editing multiple users’ permission. (The users should be in the same clinic.)
Add: Add a new lab to the available lab list.
Replace With: Replace all the current labs with the newly selected lab.
Clear: Remove all the available labs.
Find and Remove: Find and remove the unwanted lab from the list.
(!) You can only add labs that are assigned to the clinic the user belongs to.