Обзор выходных данных — это последний этап рабочего процесса. На этом этапе пользователи могут более подробно ознакомиться с выбранным сценарием лечения, прежде чем перейти к изготовлению или заказу аппарата. Цель и особенности этого этапа зависят от выбранного ранее аппарата — элайнеров или брекетов.
Элайнеры
Если на предыдущем этапе была выбрана опция «Элайнеры», пользователю будет представлена модель симуляции лечения и функции для ее доработки, а также параметры настройки этапа элайнеров.
.png)
Начните с проверки предложенных этапов для создания элайнера. В поле навигации по этапам в нижней части экрана можно увидеть, как программное обеспечение разделило весь процесс лечения на этапы. Верхняя линия представляет собой этапы лечения верхней челюсти, а нижняя линия — нижней челюсти. Каждый этап соответствует одному создаваемому элайнеру.
Можно использовать кнопку воспроизведения для анимации всей последовательности лечения или щелкнуть на любом этапе для просмотра подробной информации.
.png)
При необходимости можно отрегулировать скорость перемещения по этапам, нажав значок шестеренки в правом верхнем углу окна навигации по этапам и открыв пункт «Настройки этапов». Стандартная скорость этапа составляет 0,25 mm/2,0°.
.png)
Кроме того, для управления этапами вы можете использовать функцию «Режим последовательности этапов», которая предлагает два варианта последовательности этапов: оптимизированную и линейную.
При использовании оптимизированной последовательности этапов устанавливается автоматический интервал, позволяющий предотвратить столкновения и обеспечить постепенное перемещение зубов. В итоге общее количество этапов может оказаться довольно значительным. В свою очередь, линейная последовательность обеспечивает более прямое перемещение зубов к их конечному положению. Это позволяет сократить общее количество этапов в случаях, когда требуется минимальное перемещение зубов.

Вы можете отобразить или скрыть вспомогательные элементы для перемещения зубов, включив опцию «Вспомогательные элементы» в окне навигации.
.png)
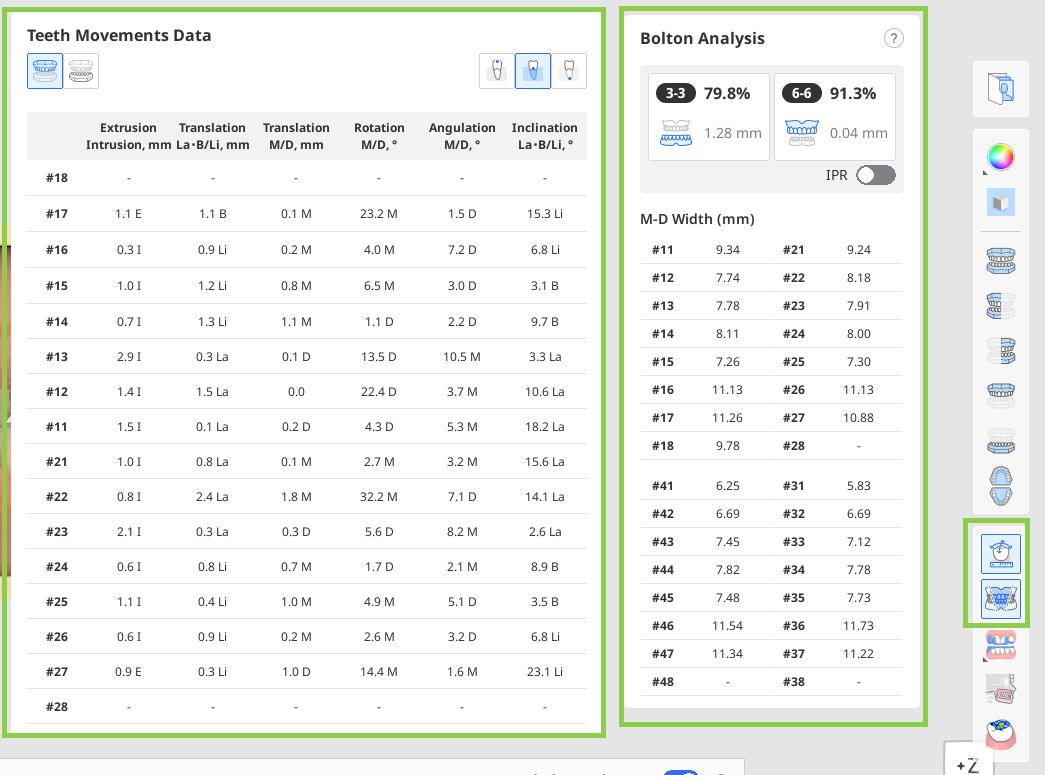
Используйте инструменты на боковой панели инструментов для просмотра подробного анализа перемещения зубов и коэффициента Болтона.
Кроме того, можно также ознакомиться с пошаговым подробным планом лечения, предоставленным для выбранного сценария лечения.
 Примечание
Эта функция доступна только в режиме онлайн.
.png)
При необходимости можно улучшить полученную симуляцию лечения с помощью функции «Доработка лечения». Более подробная информация об использовании этой функции приведена далее в настоящей главе.
.png)
По завершении нажмите кнопку «Завершить», чтобы либо сохранить проект, либо экспортировать файлы элайнеров для самостоятельной печати, либо заказать изготовление Medit Aligners. Обратите внимание, что два последних варианта являются платными.
Платная функция
Обратите внимание, что два последних варианта являются платными функциями. Цена может варьироваться в зависимости от вашего статуса владения сканером и местоположения.
Для получения более подробной информации о платном экспорте файлов, пожалуйста, нажмите здесь; для получения информации о заказе Medit Aligners нажмите здесь.
Использование функции доработки лечения
Эта функция позволяет усовершенствовать разработанный сценарий лечения с помощью ручной регулировки перемещений зубов, формы дуги, значений IPR и вспомогательных элементов. При переходе к этой функции по умолчанию выбирается инструмент регулировки перемещения зубов.
| Переместить зубы | Ручная регулировка конечного положения каждого зуба в симуляции. |
| Редактировать IPR & расстояние | Регулировка и управление интерпроксимальной редукцией (IPR) и расстоянием между зубами. |
| Редактировать вспомогательные элементы | Изменение типа, размера и положения вспомогательных элементов. |
| Редактировать форму дуги | Регулировка формы дуги. |
.png)


.png)
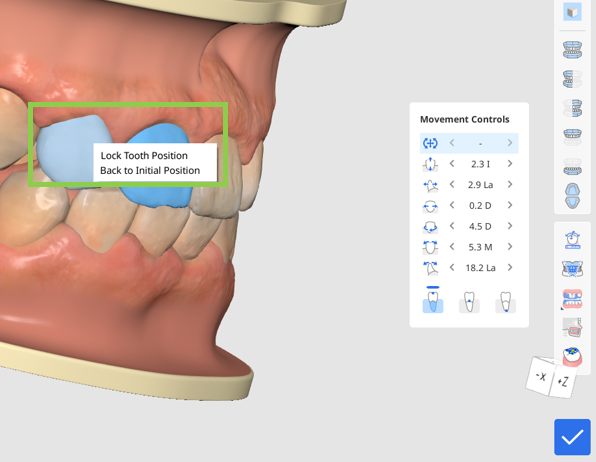
Переместить зубы
Начните с выбора типа перемещения, которое необходимо выполнить, с помощью элементов управления перемещением справа. Затем отрегулируйте положение целевых зубов с помощью мыши. Кроме того, для более точной настройки можно использовать кнопки со стрелками влево и вправо на виджете с настройками перемещения.
Для вращения данных используйте клавиши «Ctrl»/«Command» вместе с функцией «Свободное перемещение».

Регулировку положения зуба можно выполнять по коронке зуба, центру сопротивления или верхушке корня. Выберите нужное значение на виджете «Управление движением».
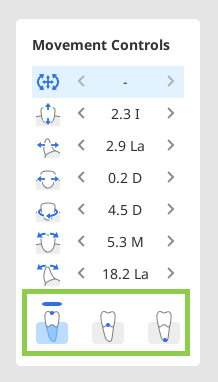
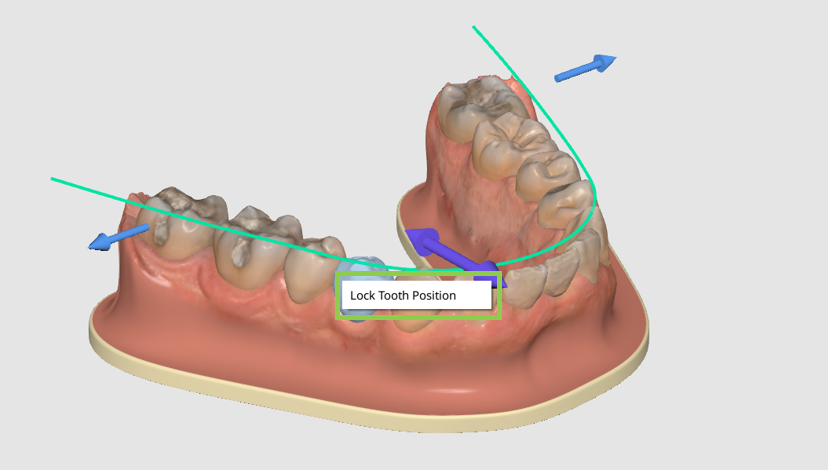
Любой зуб в рамках симуляции может быть возвращен в положение по умолчанию с помощью опции «Вернуться к исходному положению». Чтобы использовать эту опцию, щелкните правой кнопкой мыши по зубу.
Кроме того, щелкнув правой кнопкой мыши, вы также можете зафиксировать положение зуба.
Редактировать IPR & расстояние
Нажмите на кружок, расположенный между зубами, для которых необходимо добавить расстояние или IPR.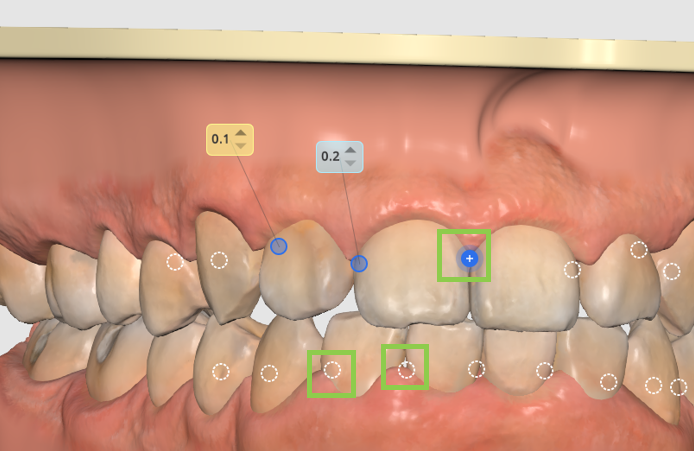
Затем при необходимости скорректируйте значение, чтобы добиться требуемого значения расстояния или значения IPR. Значения, выделенные синим, относятся к IPR, а желтым — к расстоянию.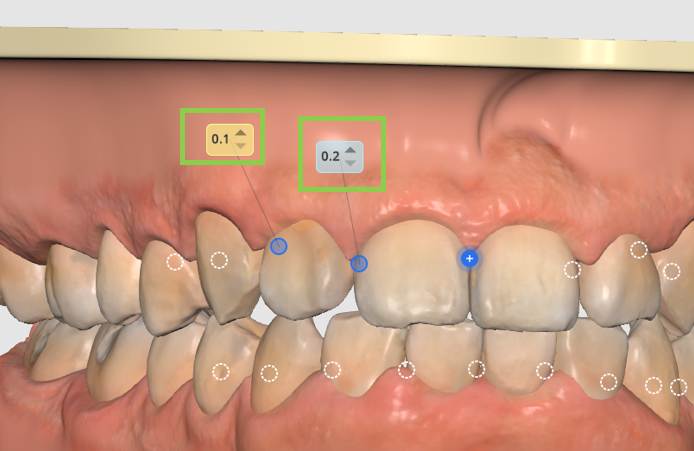
Чтобы удалить расстояние/IPR, нажмите на кружок еще раз. Вы можете зафиксировать зуб на месте, щелкнув по нему правой кнопкой мыши.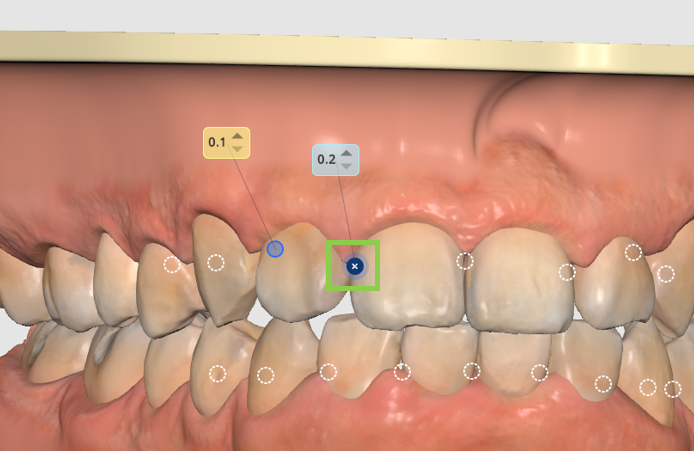
Редактировать вспомогательные элементы
Вы можете удалить стандартные аттачменты по отдельности, щелкнув по каждому из них правой кнопкой мыши, или удалить все сразу, используя функцию «Удалить вспомогательные элементы» в левом нижнем углу.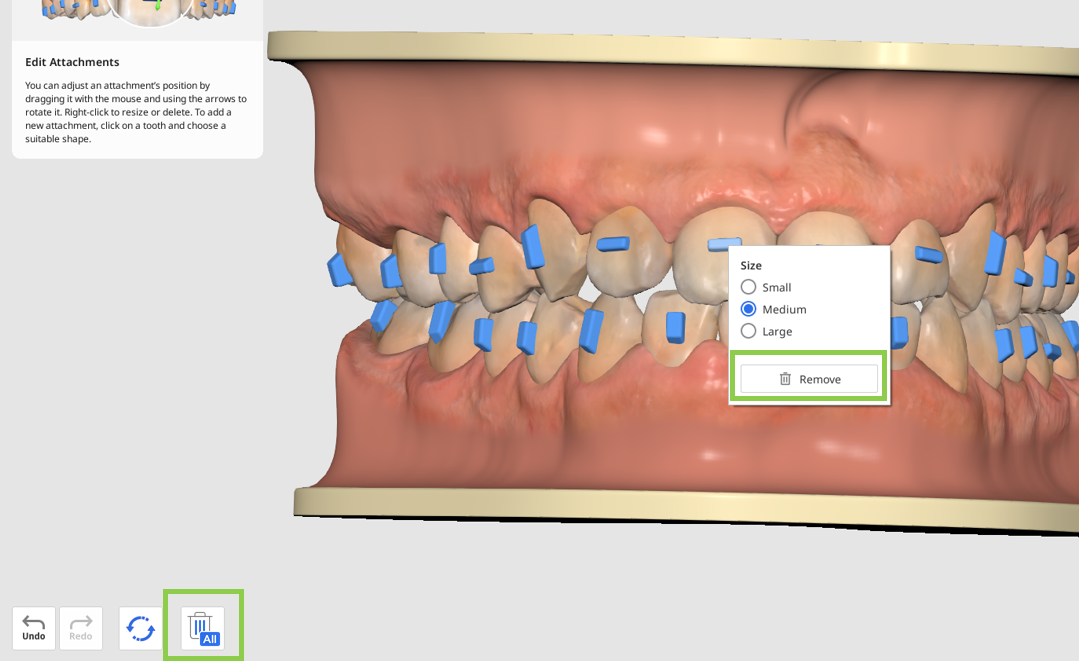
Нажмите на зуб, чтобы изменить стандартный аттачмент или добавить новый вспомогательный элемент. Доступны три типа элементов: аттачменты базовой формы (например, горизонтальные, вертикальные, эллиптические и т. д.), направляющие для прецизионных вырезов, необходимые при использовании эластиков, и элементы точек давления..png)
Щелкните правой кнопкой мыши по элементу, чтобы изменить его размер, и перетащите его мышью, чтобы изменить его положение.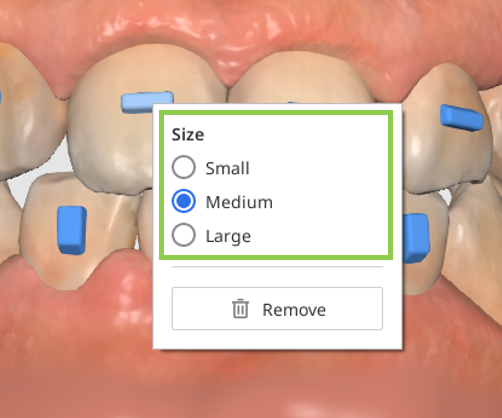
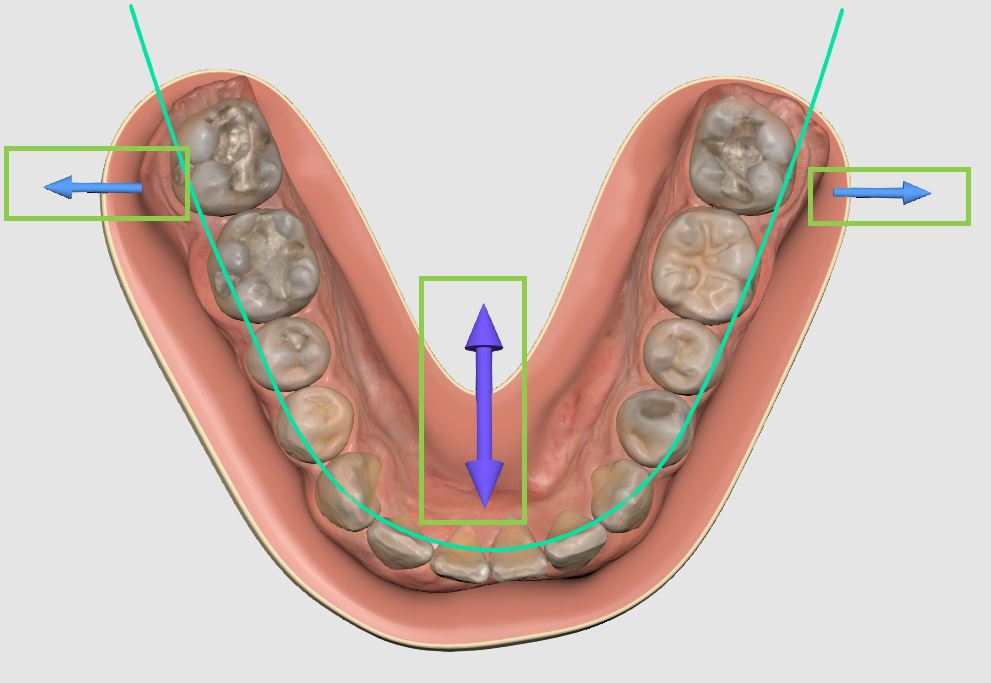
Редактировать форму дуги
Используйте функцию просмотра на боковой панели инструментов для большего удобства при использовании этой функции.
Обратите внимание! Регулировка формы дуги влияет на перемещение зуба. Чтобы предотвратить нежелательные изменения, можно заблокировать положение зуба, щелкнув по нему правой кнопкой мыши перед началом работы.
Затем используйте стрелки управления для регулировки формы дуги.
Сброс изменений
Вы можете отменить либо последнее изменение, используя кнопку «Отменить действие» в левом нижнем углу, либо отменить несколько изменений с помощью одной из опций функции «Сброс»: все изменения доработки лечения, изменения только вспомогательных элементов или все изменения, связанные с перемещениями зубов (IPR, расстояние, ручное перемещение зубов и регулировка формы дуги).

По завершении нажмите кнопку «Готово» в правом нижнем углу экрана, чтобы сохранить параметры доработки лечения и вернуться к этапу «Обзор выходных данных».
Брекеты
Если на предыдущем этапе была выбрана опция «Брекеты», пользователю будет представлена таблица с подробной информацией об аппаратах, необходимых для проведения лечения.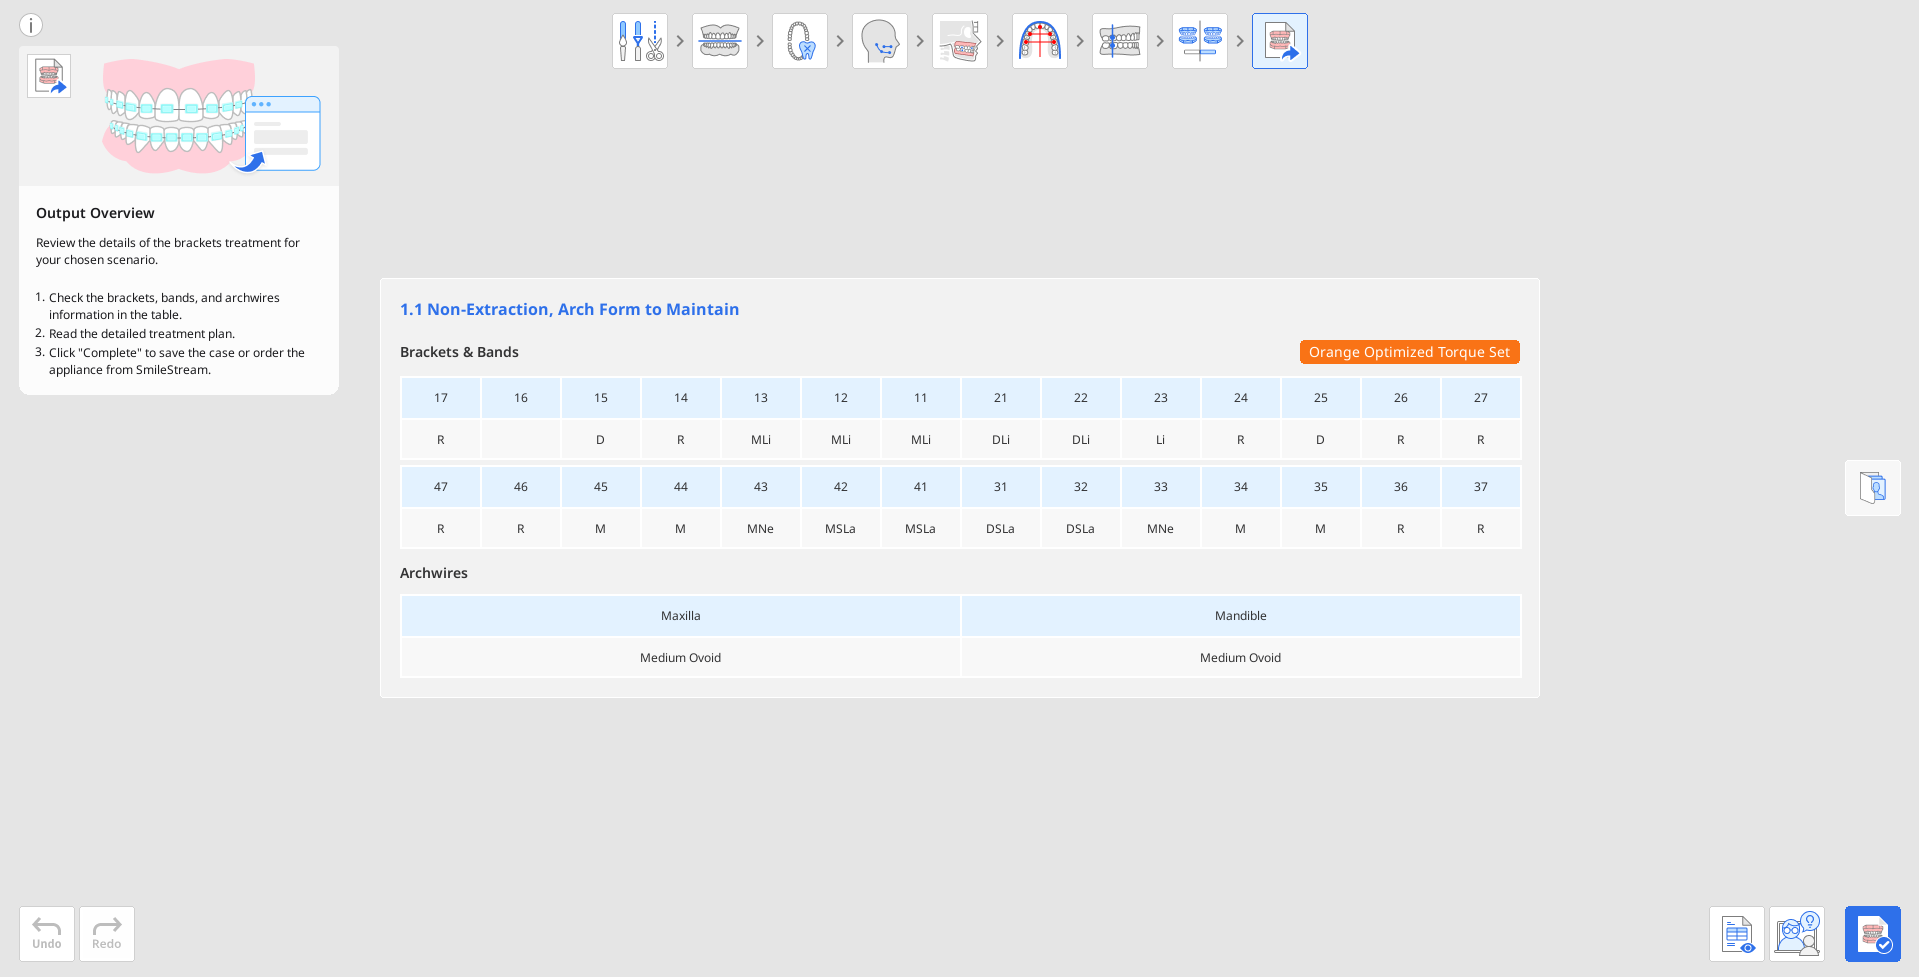
Проверьте информацию о созданных брекетах, включая проволочные дуги, резинки и торк, поскольку эти данные будут отправлены в SmileStream для завершения процесса заказа.
Ознакомьтесь с пошаговым подробным планом лечения, предоставленным для выбранного сценария.
ПримечаниеЭта функция доступна только в режиме онлайн.
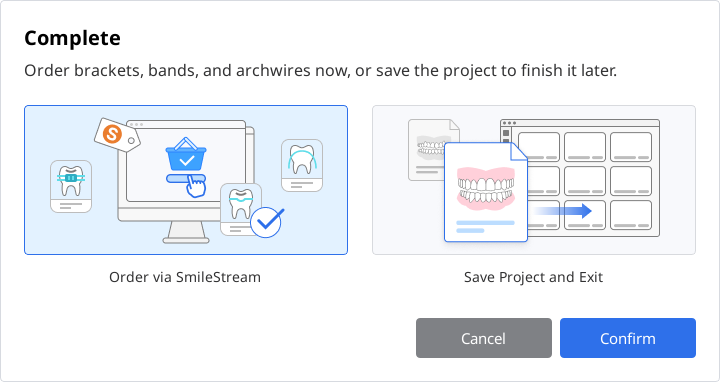
По завершении нажмите кнопку «Завершить» в правом нижнем углу, чтобы завершить и сохранить проект. Можно выбрать два варианта: сохранить проект и перейти в систему SmileStream для завершения процесса заказа или закрыть программу и сохранить ход выполнения проекта как файл проекта в системе Medit Link для последующего заказа.
Если вы решите заказать аппарат сразу, вся информация, необходимая для заказа брекетов, будет передана SmileStream, и вы будете перенаправлены на страницу ниже. Еще раз проверьте автоматически заполненные данные. Все данные могут быть изменены непосредственно в SmileStream перед размещением заказа, но они не будут обновлены в приложении.
ПримечаниеЭта функция доступна только в режиме онлайн.
