Output Overview is the last step in the workflow. Here, users can take a closer look at the selected treatment scenario before proceeding to appliance fabrication or ordering. The purpose and features of this step will vary based on the appliance option chosen earlier - aligners or brackets.
Aligners
If the “Aligners“ option was chosen in the previous step, the user is presented with the model of the treatment simulation and features for its refinement, as well as the aligner staging set-up options.
.png)
Start by reviewing the suggested staging for aligner creation. In the staging navigation box at the bottom of the screen, you’ll see how the software has divided the entire treatment into stages. The upper line represents the staging for the maxilla, and the bottom line for the mandible. Each stage corresponds to one aligner to be created.
You can use the play button to animate the full treatment sequence, or click on any stage to review it in detail.
.png)
If needed, you can adjust the staging speed by clicking the gear icon in the top-right corner of the staging navigation box and opening “Staging Settings.” The default staging speed is 0.25 mm / 2.0°.
.png)
You can also control staging using “Staging Mode,” which offers two options: Optimized and Linear.
With Optimized, automatic spacing is applied to prevent collisions and allow teeth to move gradually. As a result, the total number of stages may be high. With Linear, teeth move along a more direct path to their final positions. This can reduce the total number of stages, especially in cases with minimal tooth movement.

You can choose to display or hide the auxiliary tooth movement aids by clicking the “Auxiliary Elements” option in the navigation box.
.png)
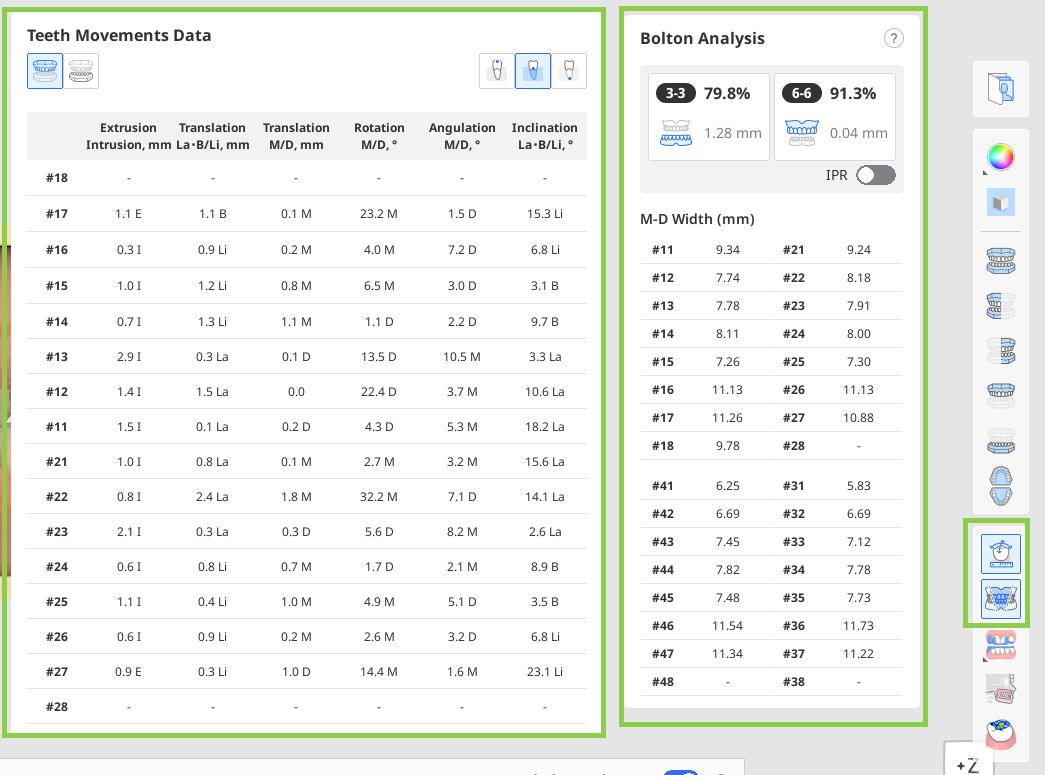
Use the tools in the Side Toolbar to view a detailed analysis of tooth movement and the Bolton ratio.
You can also open and read a step-by-step, detailed treatment plan provided for your treatment scenario.
 Note
NoteThis feature is available only in the online environment.
.png)
If needed, you can improve the generated treatment simulation using the “Treatment Refinement” feature. You’ll find more details on how to use it later in this chapter.
.png)
When you're done, click the "Complete" button to either save the project, export aligner files for self-printing, or order Medit Aligners manufactured. Note that the latter two are paid options.
Paid Features
Note that the latter two options are paid features. Pricing may vary based on your scanner ownership status and location.
For more details on paid file export, please click here; for more details on ordering Medit Aligners, please click here.
How to Use Treatment Refinement
This feature allows users to enhance the generated treatment by manually adjusting tooth movements, arch form, IPR values, and auxiliary elements. When entering this mode, the tooth movement adjustment tool is selected by default.
| Move Teeth | Manually adjust each tooth's final position in the simulation. |
| Edit IPR & Spacing | Adjust and manage interproximal reduction (IPR) and tooth spacing. |
| Edit Auxiliaries | Change the type, size, and position of the auxiliary elements. |
| Edit Arch Form | Adjust the shape of the arch form. |
.png)


.png)
Move Teeth
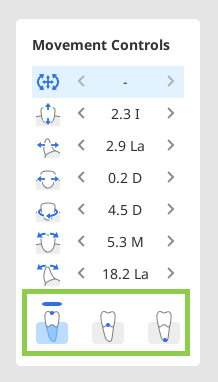
Start by selecting the type of movement you want to perform using the Movement Controls on the right. Then, adjust the target teeth using your mouse. Alternatively, you can use the left and right arrows in the movement widget for more precise adjustments.
Use Ctrl/Command with Free Move option to rotate data.

Tooth movement can be performed by the tooth crown, center of resistance, or root apex. Select desired in the Movement Controls widget.
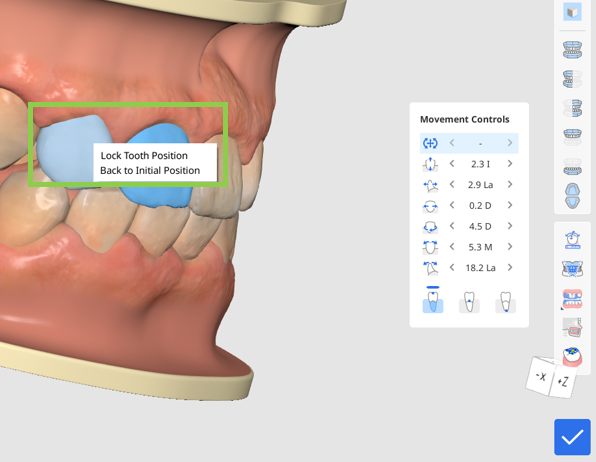
Any tooth in the simulation can be returned to the pre-treatment positioning with the “Back to Initial Position“ option. Right-click a tooth to use it.
You can also lock tooth position with a right-click.
Edit IPR & Spacing
Click the circle located between the teeth where you want to add spacing or IPR.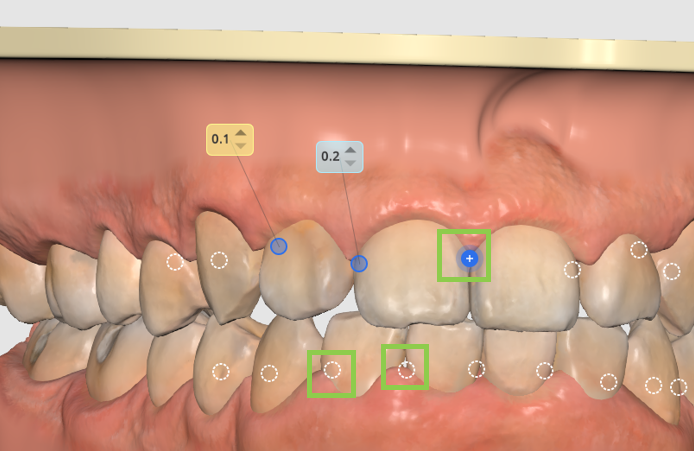
Then, adjust the value as needed to set the desired amount of spacing or IPR—blue values represent IPR, while yellow values indicate spacing.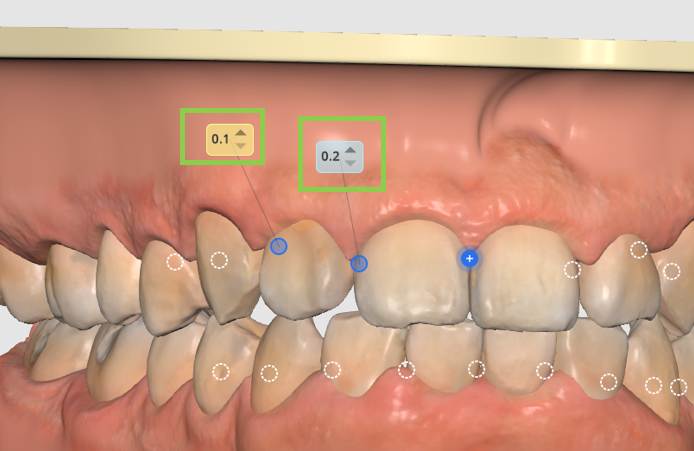
To remove the spacing/IPR, simply click the circle again. You can lock a tooth in place by right-clicking it.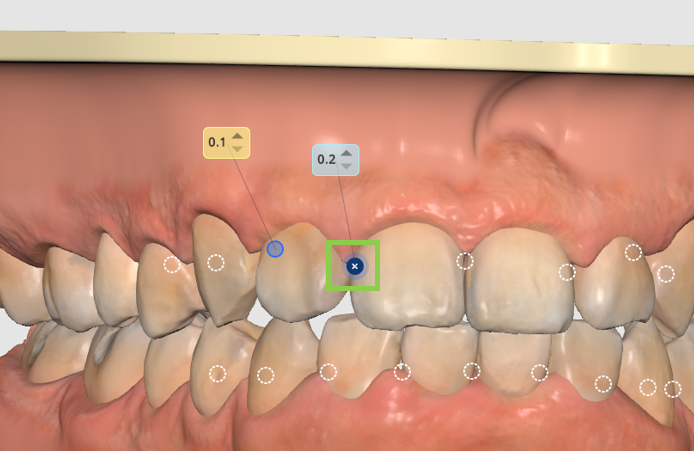
Edit Auxiliaries
You can delete default attachments individually by right-clicking on them, or remove all at once using the “Remove Auxiliaries” option in the bottom-left corner.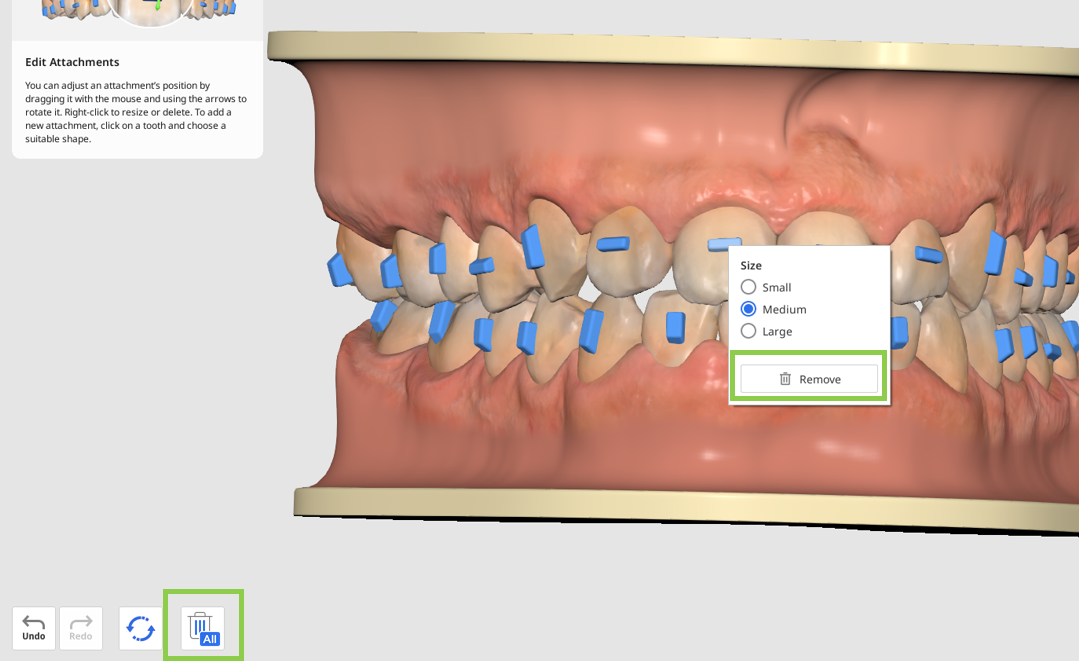
Click on a tooth to change the default attachment or add a new auxiliary element. There are three types of elements available: basic-shape attachments (e.g. horizontal, vertical, elliptical, etc.), guidelines for precision cuts needed when using elastics, and pressure point elements..png)
Right-click any element to adjust its size, and drag it with your mouse to reposition it freely.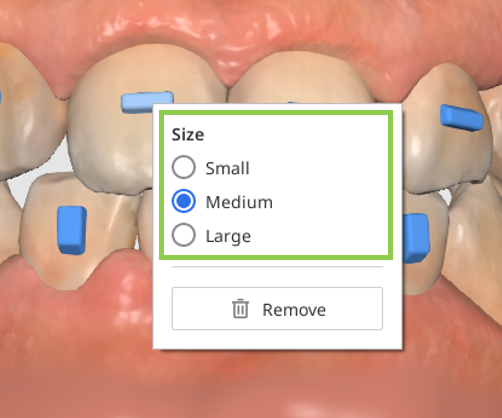
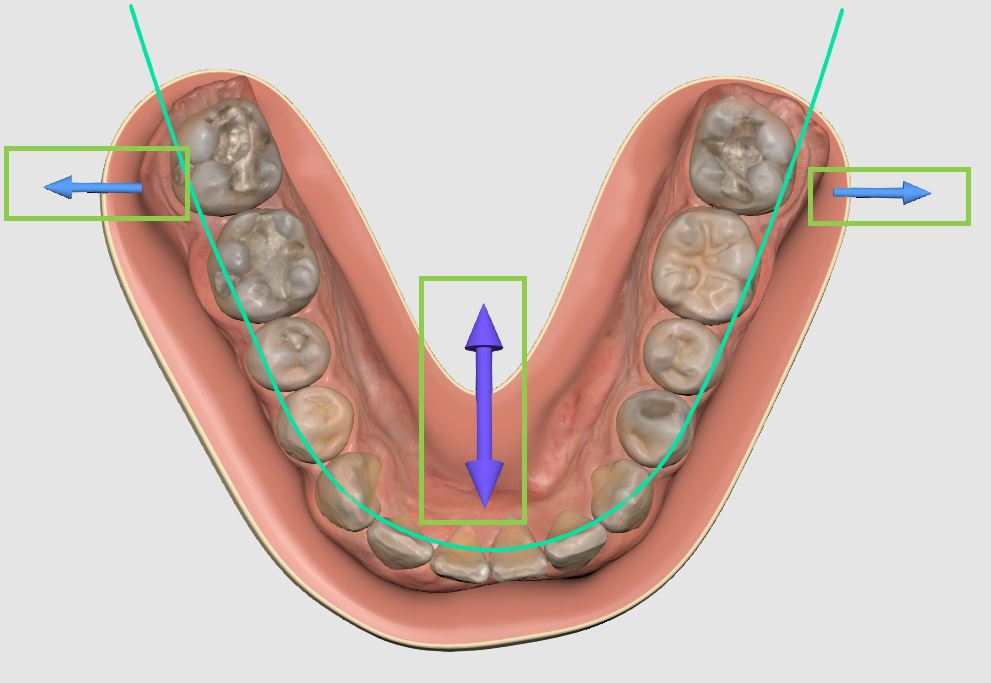
Edit Arch Form
Utilize the viewing options in the Side Toolbar for more comfort when using this feature.
Note that adjusting the arch form will affect tooth movement. To prevent unwanted changes, you can lock a tooth’s position by right-clicking on it before you begin.
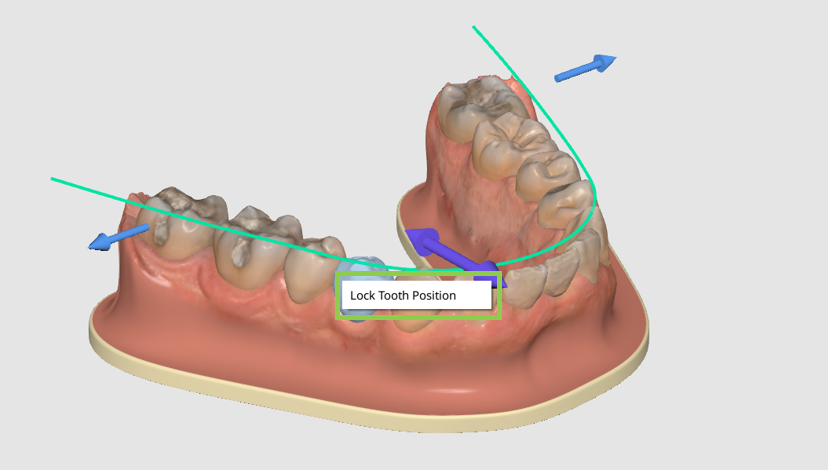
Then, use the control arrows to make adjustments to the arch form.
Resetting Changes
You can undo a recent change using the “Undo” button in the bottom-left corner, or use the “Reset” options to reverse multiple changes—either all treatment refinement changes, only auxiliary element changes, or all modifications related to tooth movement (IPR, spacing, manual teeth movement, and arch form adjustments).

When finished, click “Done“ in the bottom right corner to save treatment refinements and return to Output Overview.
Brackets
If the “Brackets“ option was chosen in the previous step, the user is presented with a detailed table of the appliances that will be required for treatment.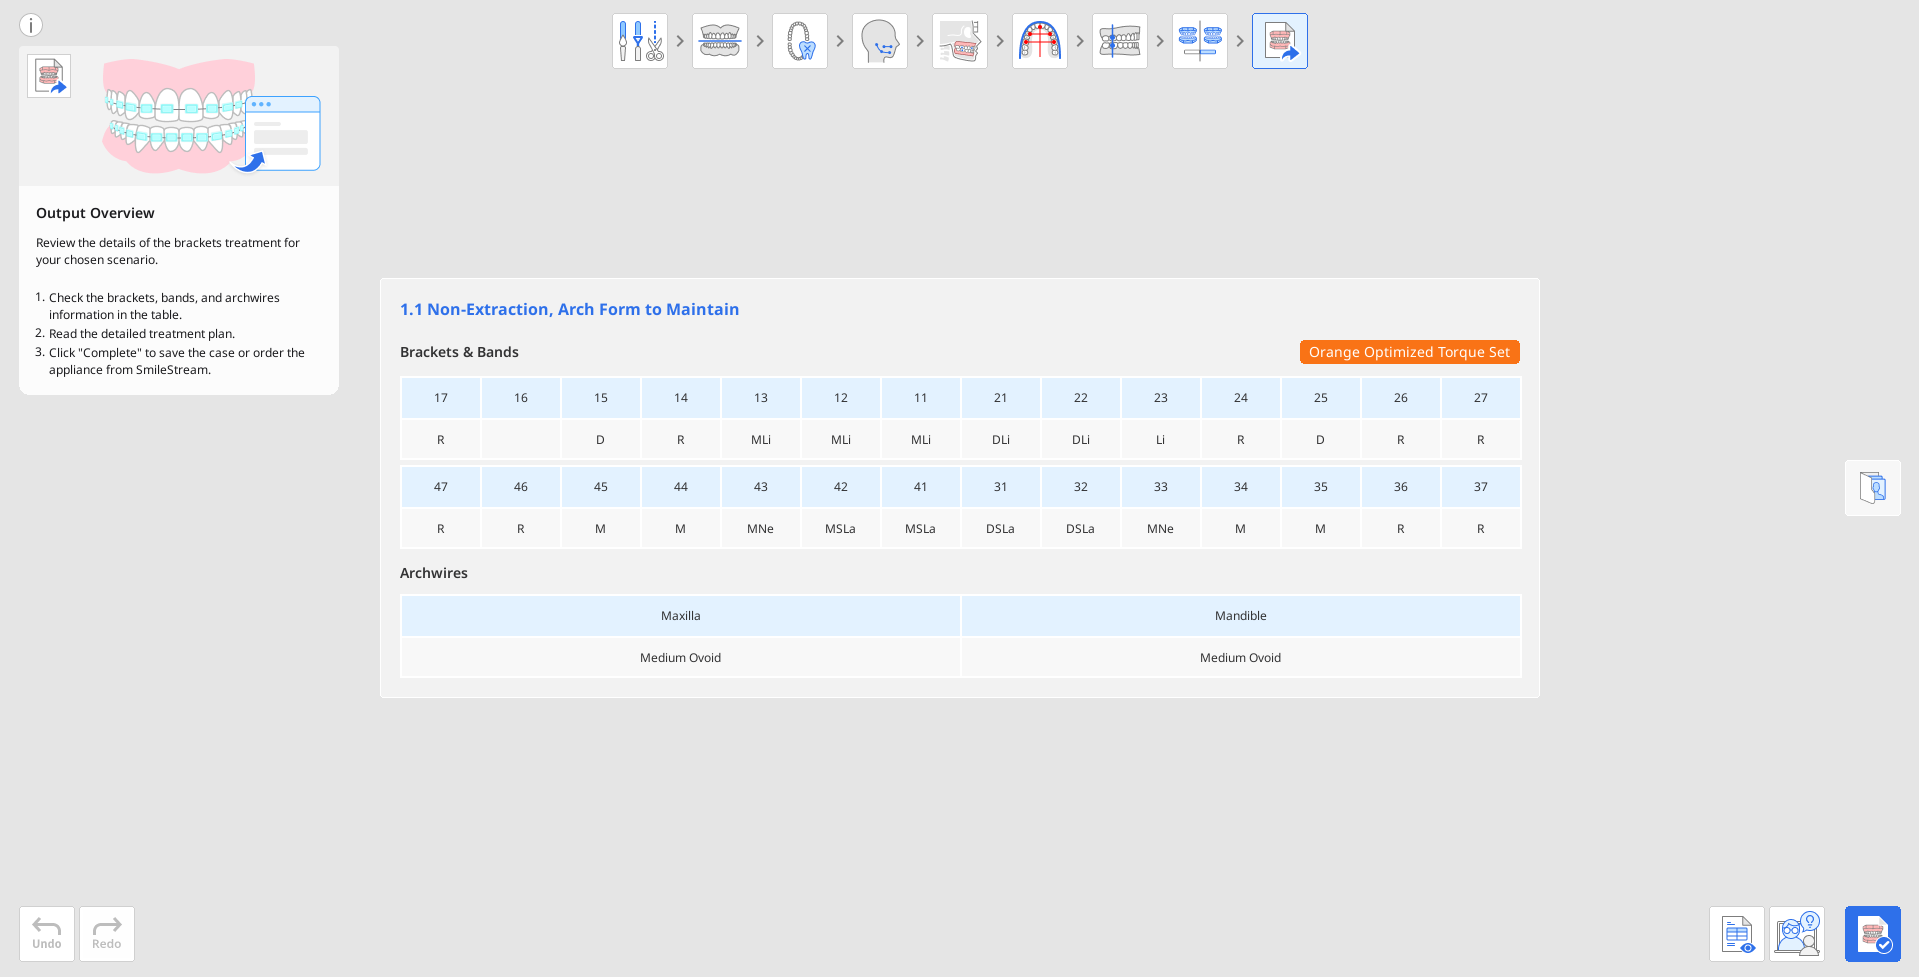
Check the generated brackets information, including archwires, bands, and torque prescription, as it will be further sent to SmileStream to complete the order process.
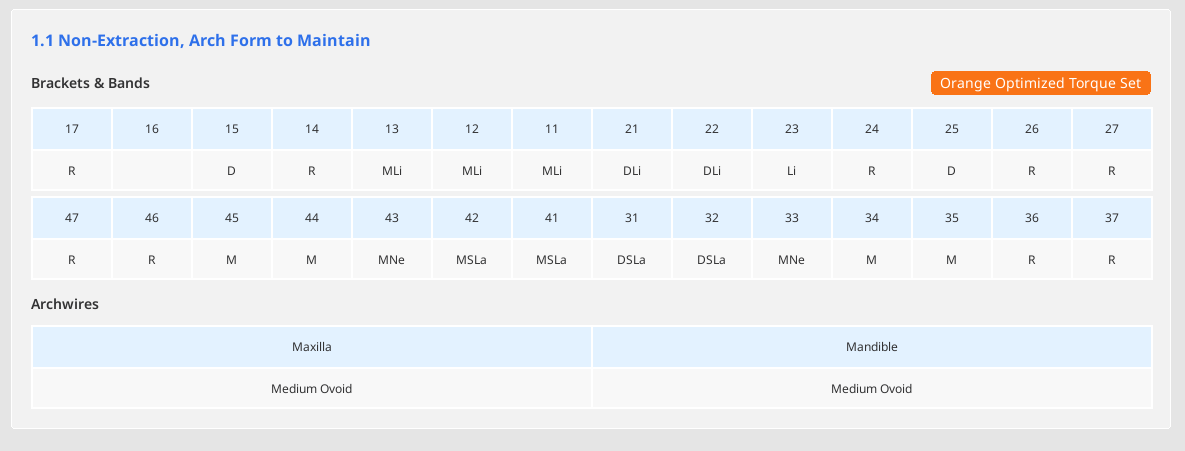
Open and read a step-by-step detailed treatment plan provided for your chosen scenario.
NoteThis feature is available only in the online environment.

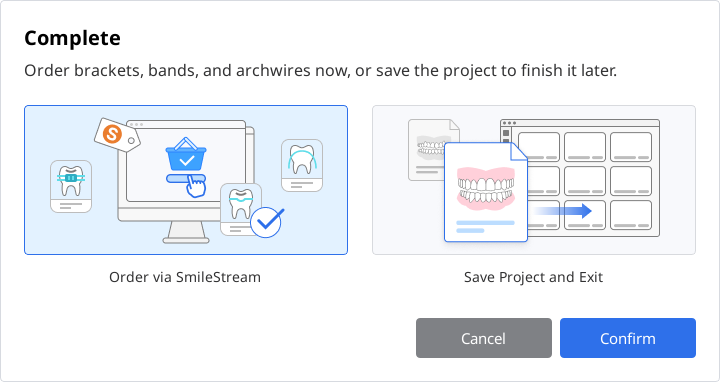
Once you're finished, click "Complete" in the bottom right corner to finalize and save your project. You have two choices: save the project and move to SmileStream to complete the order process, or close the program and save the case progress as a project file in Medit Link for ordering later.
If you choose to order the appliance immediately, all information required for the bracket order will be shared with SmileStream, and you will be redirected to the below page. Check the automatically filled information once again. All information can be changed right in the SmileStream before placing an order but it will not be updated in app.
NoteThis feature is available only in the online environment.
