User Interface
- 07 May 2024
- 3 Minutes to read
- Print
- DarkLight
- PDF
User Interface
- Updated on 07 May 2024
- 3 Minutes to read
- Print
- DarkLight
- PDF
Article summary
Did you find this summary helpful?
Thank you for your feedback
User Interface at a Glance

| A | Title Bar |
| B | Workflow Steps |
| C | Guide Message Panel |
| D | Data Tree |
| E | Action Control Buttons |
| F | 3D Data |
| G | Toolbox |
| H | Side Toolbar |
| I | View Cube |
Title Bar
The Title Bar is the ribbon at the top of the application window that contains basic controls on the right and the program menu on the left. It also shows the app name.
 | Menu | Manage the opened project, access available assistance resources (user guide, tutorial page, help center), and check app details and settings. |
 | Help Center | Go to the Medit Help Center page dedicated to this app. |
 | Select Video Record Area | Specify which area shall be captured for video recording. |
 | Start/Stop Video Recording | Start and stop the video recording of the screen. |
 | Screenshot | Take a screenshot. Capture the app with or without the title bar using automatic selection, or click and drag to capture only the desired area. |
 | Screenshot Manager | View, export, or delete the screenshots. Upon completion, all captured images will be saved to the case automatically. |
 | Minimize | Minimize the application window. |
 | Restore | Maximize or restore the application window. |
 | Exit | Close the application. |
Data Tree
The Data Tree is located on the left side of the screen, showing the data you use for the current project in groups. You can control each data visibility by clicking its icon in the tree or change its transparency by moving its slider.
🔎Note
Data grouping will vary depending on the step you are working in and its goals.
Right-click the data or data group to see the context menu for more data control.

| Show This Only | Display only the chosen data and hide all others. |
| Show/Hide | Show or hide the chosen data. |
| Zoom to This Data | Zoom fit on the chosen data. |
| Rename | Change the name of the data. Note that the name of the file in Medit Link will not change. |
| Delete | Delete data from the Data Tree in this project. Note that the file will not be deleted from the case in Medit Link. |
Action Control Buttons
There are two buttons for action control - Undo and Redo. Both are located in the bottom left corner of the application window.
 | Undo | Undo the previous action. |
 | Redo | Redo the previous action. |
Toolboxes
The Toolbox of each step provides features necessary for completing the primary goal of that step. Below are the explanations for the features provided in each Toolbox across the entire app.
Overview
 | Import Medit Link Files | Import 3D files from Medit Link. |
 | Import Local Files | Import local files saved on your computer. |
 | Import exocad/3Shape Folder | Import an exocad or 3Shape folder. |
 | Delete Data | Select data to be deleted. |
Crown Alignment
 | Reassign Data | Change the assignment for prepared teeth, CAD, and milled prosthesis data. |
 | Align Crown Data | Automatically align milled prosthesis and CAD data. |
 | Align Selected Areas | Perform alignment of the milled prosthesis and CAD data only within a selected area. |
 | Detach Data | Detach the aligned data and bring it to the original position. |
Crown Fitting Test/Deviation Display
| Reassign Data | Change the assignment for prepared teeth, CAD, and milled prosthesis data. |
 | Color Map On/Off | Turn the Color Map on and off. |
 | Delete Measurement Results | Delete deviation measurement results by clicking on each of them. |
 | Create Sections | Create section lines. |
Data Transformation
 | Scale | Set values for the X, Y, or Z axes to scale data. |
Measurements
| Create Sections | Create section lines. |
 | View Perpendicularly to Section Line | Orient the view perpendicularly to the section line. |
 | Measure Distance by One Point | Measure the shortest distance to the adjacent 3D data or line. |
 | Measure Distance by Two Points | Measure the distance between two points. |
 | Measure Distance by Three Points | Measure the distance between a point and the line defined by another two points. |
 | Measure Length by One Point | Measure the length of the section line by one point. |
 | Measure Length by Two Points | Measure the length of a segment by two points. |
 | Measure Angle by Three Points | Measure the angle between the lines made with three points. |
 | Measure Angle by Four Points | Measure the angle between the lines made with four points. |
 | Calculate Area by One Point | Calculate the area of the section line by one point. |
 | Calculate Area by Two Points | Calculate the area of the segment by two points. |
 | Calculate Area by Selection | Calculate the selected area. |
| Delete Measurement Results | Delete measurement results and section lines by clicking on each of them. |
Side Toolbar
The Side Toolbar provides data visualization and control tools that can be used across all workflow steps.
 | Data Display Mode | Change between different data display options. (Textured/Textured with Edges/Monochrome/Monochrome with Edges/Wire-Frame) |
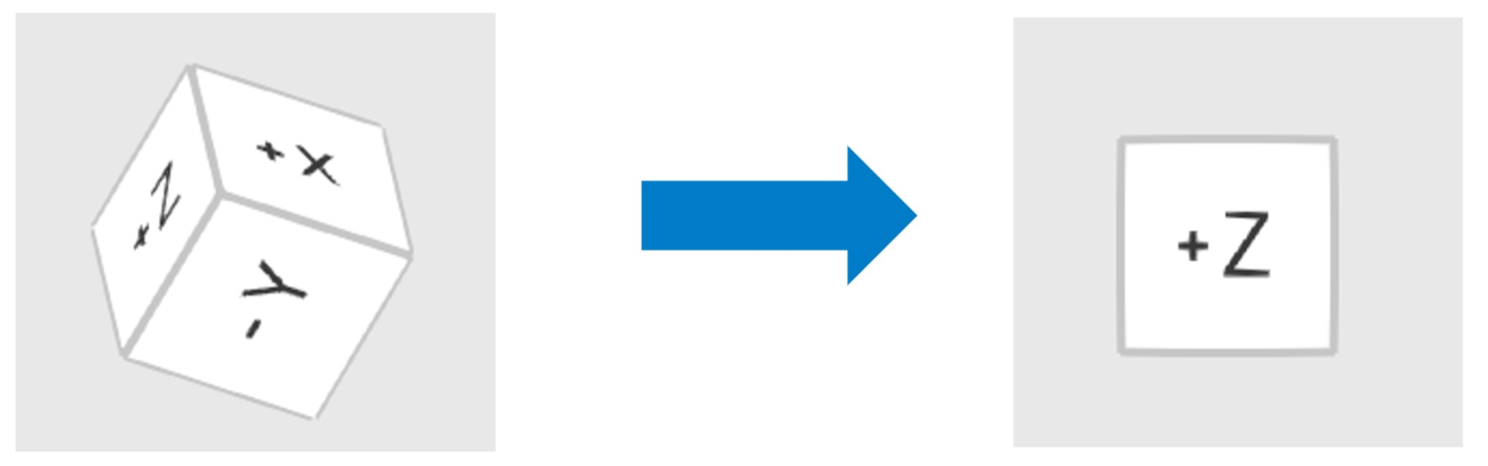
 | +Z Axis View | See the front view. |
 | -Z Axis View | See the back view. |
 | -X Axis View | See the left view. |
 | +X Axis View | See the right view. |
 | +Y Axis View | See the top view. |
 | -Y Axis View | See the bottom view. |
 | Rotate | Rotate data by click-and-drag. |
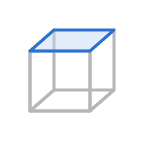
View Cube
The View Cube shows the 3D view orientation; it rotates simultaneously with the 3D data to help understand data positioning within a three-dimensional space. You can click on the visible faces of the cube to rotate data and see it from a specific viewpoint.
Was this article helpful?
