Scan Strategy
- 02 Apr 2024
- 8 Minutes to read
- Print
- DarkLight
- PDF
Scan Strategy
- Updated on 02 Apr 2024
- 8 Minutes to read
- Print
- DarkLight
- PDF
Article summary
Did you find this summary helpful?
Thank you for your feedback
Workflow
If you are ready to start your scanning with Medit Scan for Labs, you first need to establish the workflow for the case.
At the top of the screen, you can see the five scan stages consisting of the workflow, as shown in the following image.
 Based on the form information entered in the Medit Link app and the options you select in the Scan Strategy dialog, sub-stages are added to each basic stage. Click the Scan and Align Data icon to show or hide the sub-stages.

🔎Note
You can change the order of stages by dragging the scan stages icons with your mouse. You will see the available spaces marked in green.
Basic Scan Stages
 | Scan Strategy | Select the scan type between Flexible Multi-Die, Model, and Impression scanning and set the appropriate scan strategy for the selected scan type and required prosthesis. |
 | Scan | Perform the scanning process by stage. The scanning will be conducted based on the set strategy. |
 | Align Data | Manually align various data, such as post and core, wax-up, occlusion, etc., with the model. |
 | Confirm | Check the scan data and edit it if necessary. |
 | Complete | Complete scanning and start post-processing for the final result. |
Scan Strategy Setting
Based on the options you select in the Scan Strategy dialog, sub-stages are determined to form the entire workflow of the case.
Set the scan strategy for your case as follows:
- The Scan Strategy dialog appears once a scanner is connected properly to the PC.
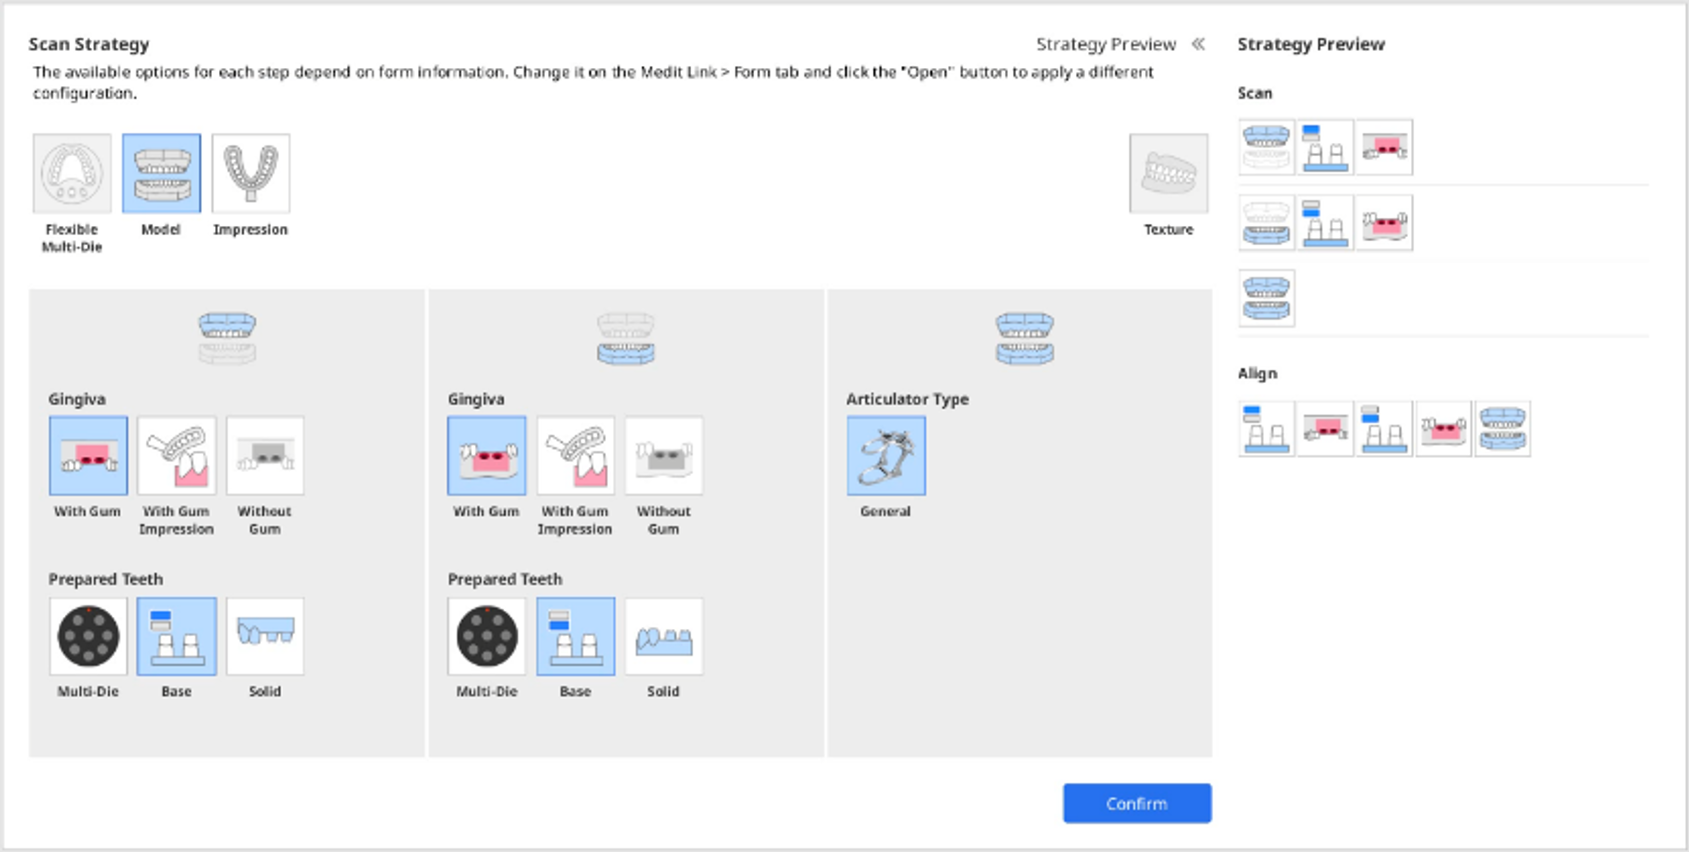
- Select the scan type between Flexible Multi-Die, Model, and Impression.
- The options in the maxilla, mandible, and occlusion sections change according to your scan type choice.
- Select the scan strategy for the mandible, maxilla, and occlusion.
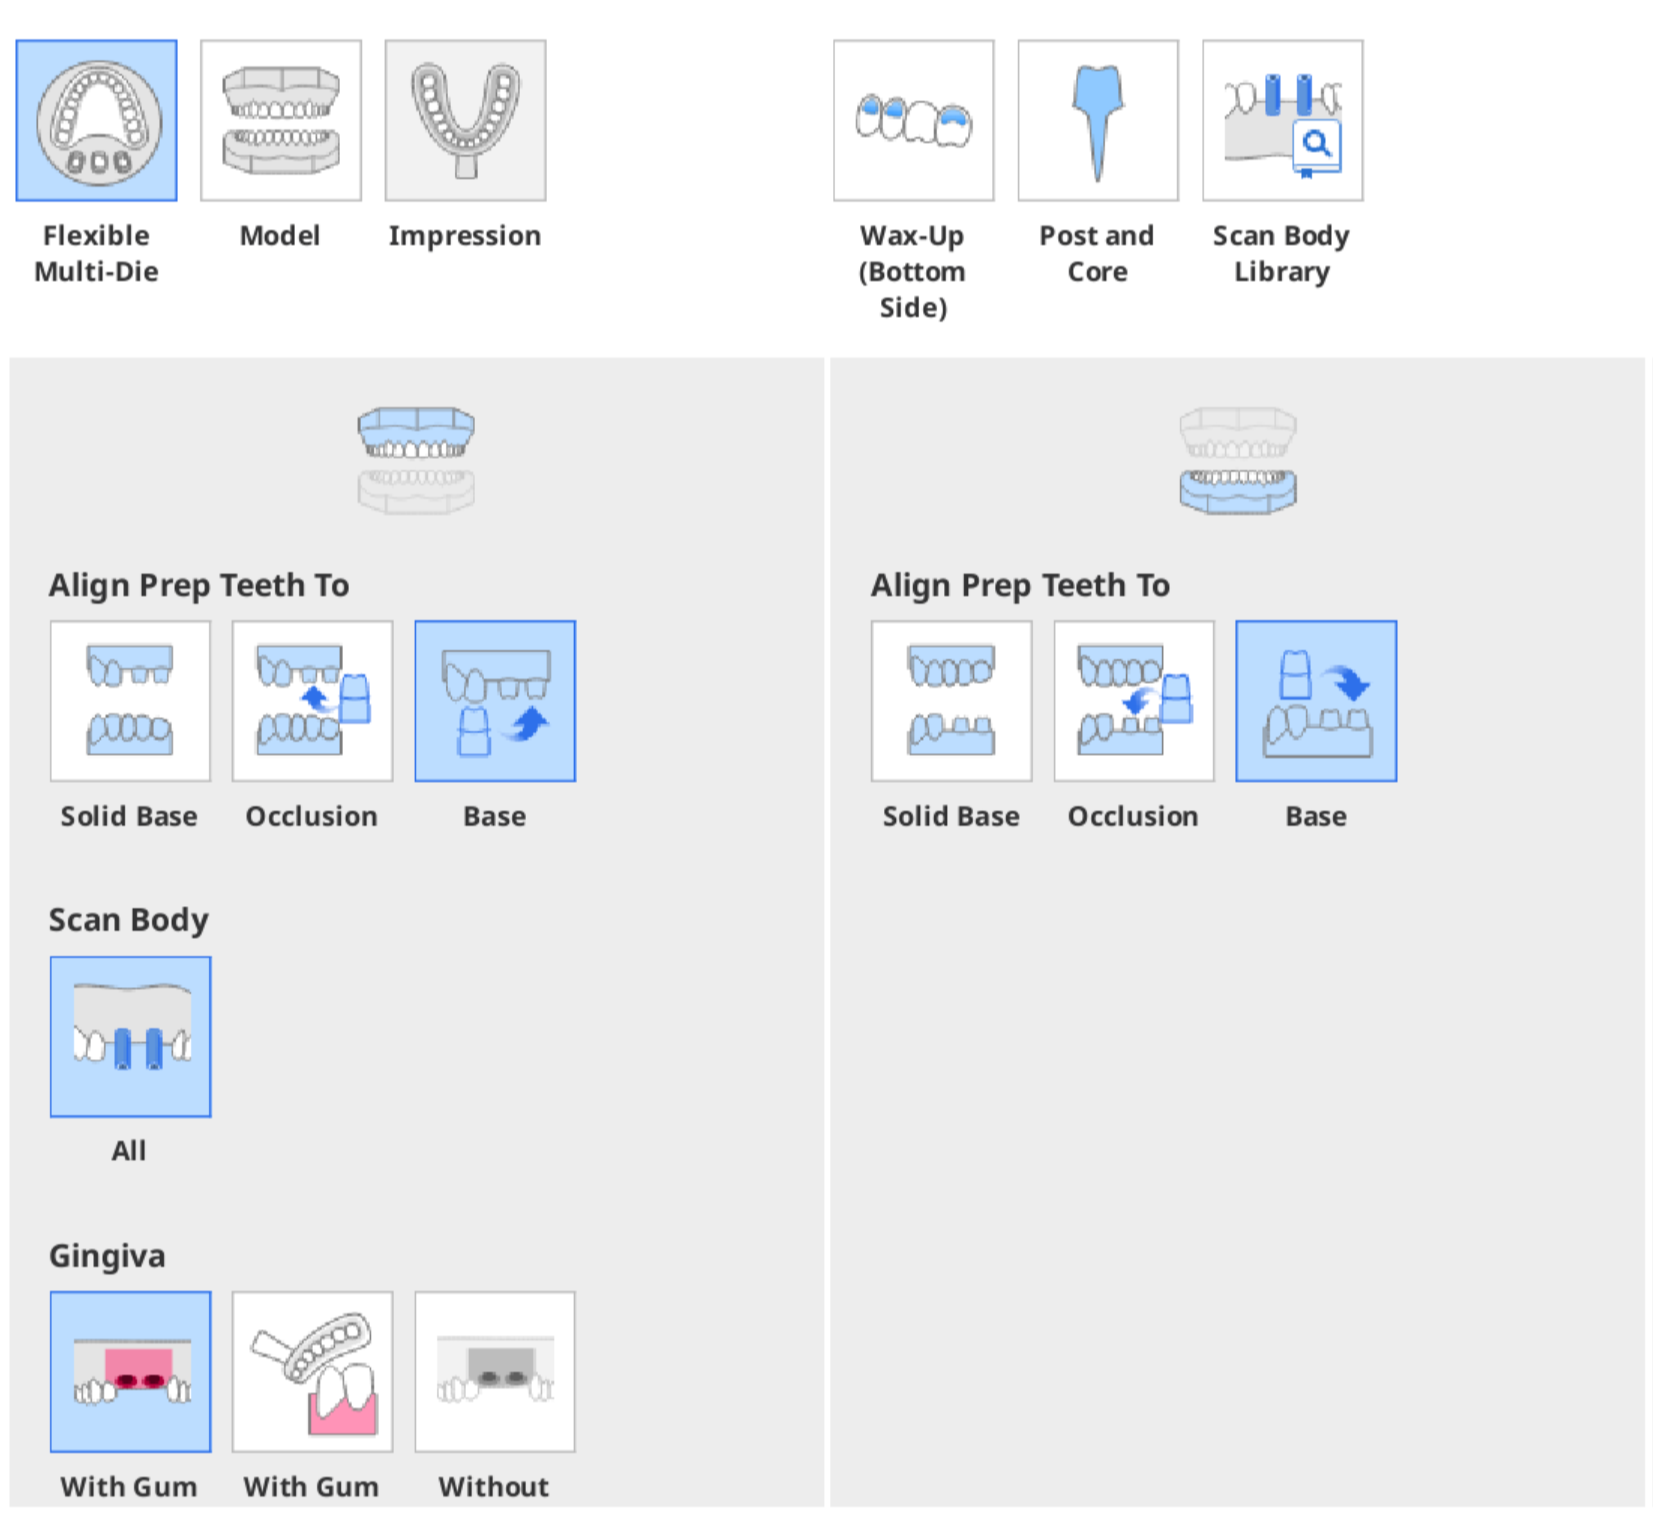
- Flexible Mullti-Die: Scan Body, Gingiva, Align Prep Teeth To
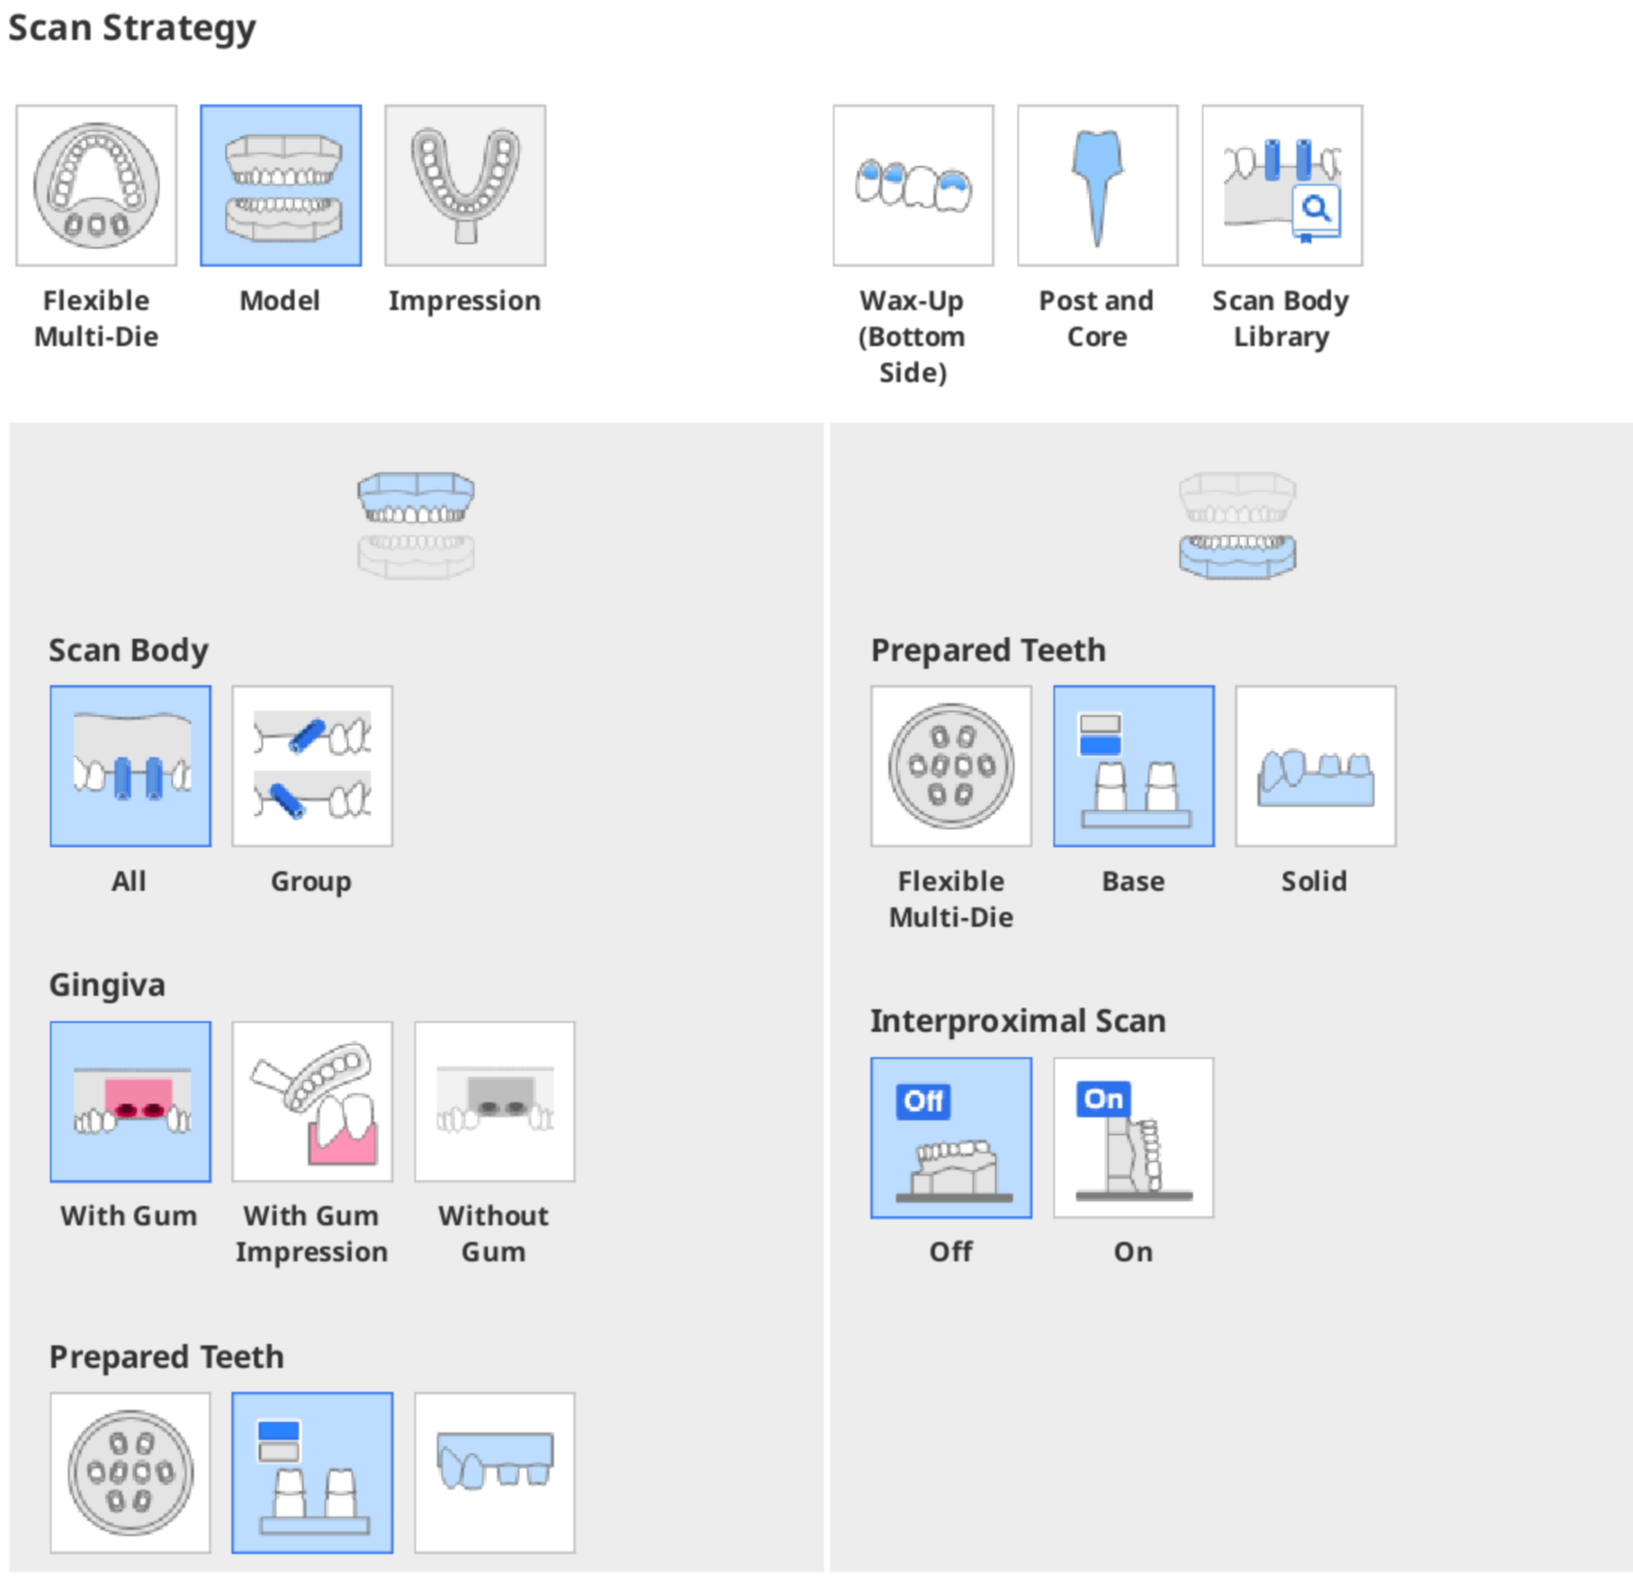
- Model: Scan Body, Gingiva, Prepared Teeth, Interproximal Scan
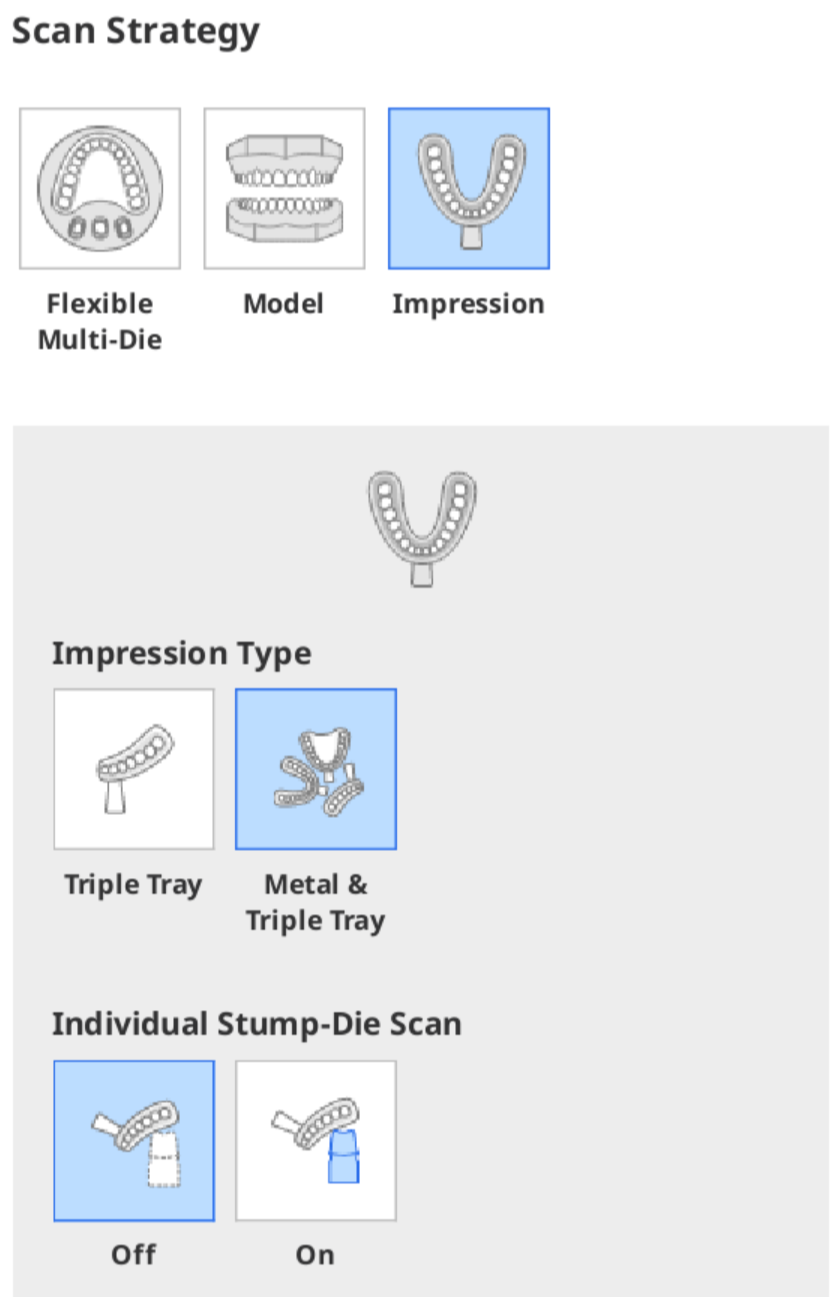
- Impression: Impression Type, Individual Stump-Die Scan
- Flexible Mullti-Die: Scan Body, Gingiva, Align Prep Teeth To
- Select all required scan stage options for your case, such as Wax-Up (Bottom Side), Post and Core, and Scan Body Library.
- Select all required scanning options, such as Movement Marker and Texture.
- Click the "Strategy Preview" to check the scan strategy set for the "Scan" and "Align" stages.
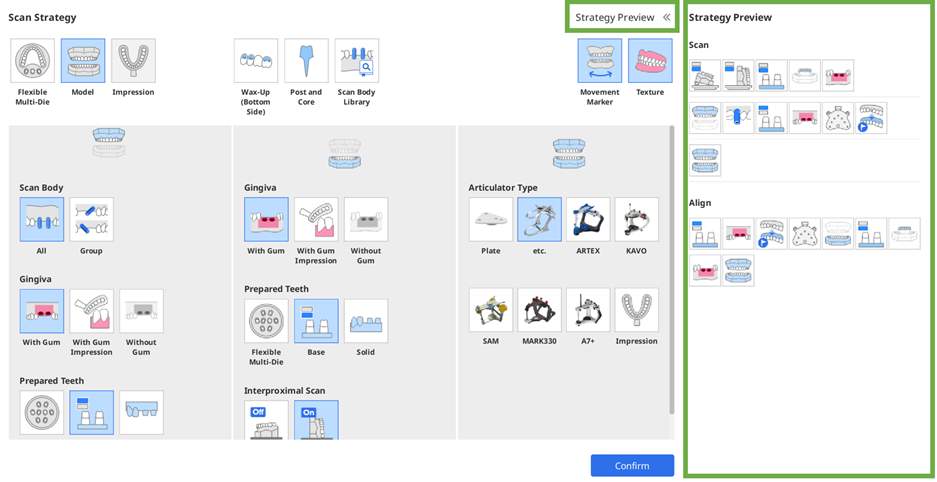
- Click the "Confirm" button to complete the scan strategy setting.


Scan Type
Select a scan type for your case.
 | Flexible Multi-Die | Select this type for scanning multiple models, not just a base but dies, simultaneously on a flexible multi-die. You do not need to have a pre-defined strategy like the Model type. You can assign the data acquired by the flexible multi-die after scanning is complete. |
 | Model | This is the most common scanning method, where you place and scan the model for each scan stage. |
 | Impression | Select this type for scanning an impression instead of a model. |
Scan Stage Options
Select all options to add to the scanning workflow. Based on the scan stage option you choose, sub-stages will be added to the "Scan" and "Align" stages.
 | Wax-Up (Bottom Side) | Select this option to scan the inside surface of the wax-up. The wax-up and the inner surface data can be aligned at the Align Data stage. |
 | Scan Body Library | Select this option for scan body library cases where you need to align the registered scan body library data to the scan data. If you select this option, you don't need to scan the scan body data on the Scan stage. Instead, you are required to align the scan body libraries in the Align Data stage. |
 | Post and Core Scan | Select this option for post and core cases where you need to scan and merge the base and impression scans to get complete and reliable scan data. Alternatively, use the intraoral scanner to get the complete data. Connect the intraoral scanner to the PC, ensure it is calibrated, and press the “Scan Using Intraoral Scanner” button. |
Scan Options
Select all options you want to apply to your data.
 | Texture | Select this option if you want the scan data to have the surface color. |

|
 | Movement Marker | This function tracks the movement of the mandible. |

Maxilla/Mandible Strategy
Align Prep Teeth To
When you select "Flexible Multi-Die" for scan type, you will be asked to select how to align the prepared data with the base.
 | Solid Base | Select this option to scan prepared teeth inside the base. |
 | Occlusion | Select this option to scan the separated prepared teeth and the base on the flexible multi-die and put them back onto the base at the Occlusion stage. |
 | Base | Select this option to scan the prepared teeth only at the Prepared Teeth stage and the prepared teeth with the base in the Maxillary or Mandibular Base stage. You can align the data at the Align Data stage. |
Prepared Teeth
When you select "Model" for scan type, you will be asked to select how to scan the prepared teeth data.
 | Flexible Multi-Die | Select this option to scan the prepared teeth on a flexible multi-die. |
|
 | Base | Select this option to scan the prepared teeth in a base. After removing the adjacent teeth from the base, divide the prepared teeth into two groups and perform scanning in two sub-stages. |
|
 | Solid | Select this option to scan a solid model with non-removable prepared teeth. No separate sub-stage is added for prepared teeth scanning, but it takes more scan shots. |
|


Scan Body Alignment
Select how to acquire scan body data.
 | All | Select this option to scan the scan bodies together with the base. The scanned data in the Base stage will be copied to the Scan Body stage and trimmed to get scan body data without conducting additional scanning for scan bodies. |
|
 | Group | Select this option to scan the base and the scan body in two separate stages. |
|


🔎Note
- The "Group" option is unavailable for the "Flexible Muti-Die" scan type. Please select "Model" to use the option.
- The "Group" option is useful for cases where scan bodies are overlapped, or base data for the missing scan bodies is required.
- When you have multiple scan bodies for the model, the program will automatically separate them into groups to get more reliable data for the case.
- The scan body data acquired in different groups can be aligned in the Align Data stage.
Gingiva
Select whether to perform the scan with or without gingiva.
 | With Gum | Select this option to scan the gingiva and align the gingiva data in a separate sub-stage for both Scan and Align Data stages. | |
 | With Gum Impression | Select this option to scan the gingiva with the impression. | 🔎Note
|
 | Without Gum | Select this option for cases where gingiva is absent. No separate sub-stages will be added to the Scan and Align Data stage. |
Interproximal Scan
This option only appears for cases that require clear scan data between teeth. Select whether to scan the interproximal areas.
 | Off | Select this option to scan the base as usual without adding sub-stages for interproximal scans to the workflow. | |
 | On | Select this option to scan the buccal and lingual interproximal areas for the mandible and maxilla. The lingual interproximal scan is performed by tilting the model.  The model is scanned with it on its side for the buccal interproximal scan. The model is scanned with it on its side for the buccal interproximal scan. |
|

Impression Type
🔎Note
Impression scanning is only available with T710. A license is required to scan impressions with T500/T300.
This option only appears when you select the "Impression" scan type. Select the type of impression tray.
 | Triple Tray | Select this option to acquire impression data with a triple tray. |
|
 | Metal & Triple Tray | Select this option to acquire impression data with two metal trays and a triple tray. Please note that alignment precision is not guaranteed with this option. |
|


Individual Stump-Die Scan
When you select the "Impression" scan type, you will be asked to select whether to scan individual stump dies.
 | Off | Select this option to scan the impression only. |
|
 | On | Select this option to scan impressions and individual stump dies on the flexible multi-die. |
|


Occlusion Strategy
Articulator Type
Select a suitable accessory for the occlusion relationship scan.
 | Plate | Select this option to use the plate and any articulator except the five semi-adjustable articulators below. |
 | General | Select this option if you use a regular articulator other than the five articulators below instead of using the plate. |
 | ARTEX | Select this option if you use the ARTEX articulator. |
 | KAVO | Select this option if you use the KAVO articulator. |
 | SAM | Select this option if you use the SAM articulator. |
 | MARK330 | Select this option if you use the MARK330 articulator. |
 | A7+ | Select this option if you use the A7+ articulator. |
 | Impression | Select this option to scan occlusion data with an impression. |
Mandibular Base Scan
If you select the ARTEX, KAVO, SAM, or MARK330 options for the articulator type, you will be asked to choose how to scan the mandibular base.
 | With Jig | Select this option to use the articulator jig to install the mandibular base and move it to the position of the virtual articulator. |
|
 | Without Jig | If there is no articulator jig, a mounting plate can be used for data alignment and moving the model to the position of the virtual articulator. |
|


Sub-Stages
The number and configuration of sub-stages can vary according to the form information entered in Medit Link and the options you select in the Scan Strategy stage in Medit Scan for Labs.
The following sub-stages will be automatically added to the workflow after you select options in the Scan Strategy Management dialog.
| General |  | Prepared Tooth | Scan the individual prepared tooth separated from the flexible multi-die. The tooth number appears at the bottom of the icon. |
 | Occlusion Bite | Scan bite materials placed on the arch model. | |
 | Mandibular Base (Articulator Jig) | Scan mandibular base with articulator jig. | |
 | Movement Marker | Scan a movement marker placed on the maxillary model. | |
 | Post and Core | Scan an individual post and core. The tooth number appears at the bottom of the icon. | |
 | Scan Body | Scan an individual scan body. The tooth number appears at the bottom of the icon. | |
 | Mounting Plate | Scan the bottom side of the mounting plate. | |
 | Occlusion | Scan the occlusion. | |
 | Prepared Teeth (Maxilla; Base) | Scan only prepared teeth in the maxilla by placing them on the base without other teeth. | |
 | Prepared Teeth (Mandible; Base) | Scan only prepared teeth in the mandible by placing them on the base without other teeth. | |
 | Maxillary Scan Body | Scan a scan body placed in the maxilla model. | |
 | Mandibular Scan Body | Scan a scan body placed in the mandible model. | |
 | Pre-Operation Model (Maxilla) | Scan the pre-operation model for the maxilla. | |
 | Pre-Operation Model (Mandible) | Scan the pre-operation model for the mandible. | |
.png) | Wax Rim | Scan the wax rim by placing it on the maxillary or mandibular base. | |
| Interproximal Area Scan |  | Interproximal Area (Maxilla; Buccal) | Scan the buccal interproximal areas in the maxilla. |
 | Interproximal Area (Mandible; Buccal) | Scan the buccal interproximal areas in the mandible. | |
 | Interproximal Area (Maxilla; Lingual) | Scan the lingual interproximal areas in the maxilla. | |
 | Interproximal Area (Mandible; Lingual) | Scan the lingual interproximal areas in the mandible. | |
| Gingiva Scan |  | Gingiva (Maxilla) | Scan maxillary gingiva materials. |
 | Gingiva (Mandible) | Scan mandibular gingiva materials. | |
| Impression Scan |  | Impression (Maxillary) | Scan maxillary impression. |
 | Impression (Mandible) | Scan mandibular impression. | |
| Denture Scan |  | Denture (Maxilla; Inner Surface) | Scan the inner surface of the maxillary denture. |
 | Denture (Maxilla; Outer Surface) | Scan the outer surface of the maxillary denture. | |
 | Denture (Mandible; Inner Surface) | Scan the inner surface of the mandibular denture. | |
 | Denture (Mandible; Outer Surface) | Scan the outer surface of the mandibular denture. | |
| Wax-Up Scan |  | Wax-Up (Maxilla; Bottom Side) | Scan the bottom side of a wax-up in the maxilla. Edit the scan data to remove the unnecessary parts. |
 | Wax-Up (Mandible; Bottom Side) | Scan the bottom side of a wax-up in the mandible. Edit the scan data to remove the unnecessary parts. | |
 | Wax-Up (Maxilla) | Scan a maxillary wax-up by placing it on the model. | |
 | Wax-Up (Mandible) | Scan a mandibular wax-up by placing it on the model. |
Was this article helpful?
